Welcome to my blog, the story of my continuing journey into the World of Zombie Wargames.

Monday, 5 January 2015

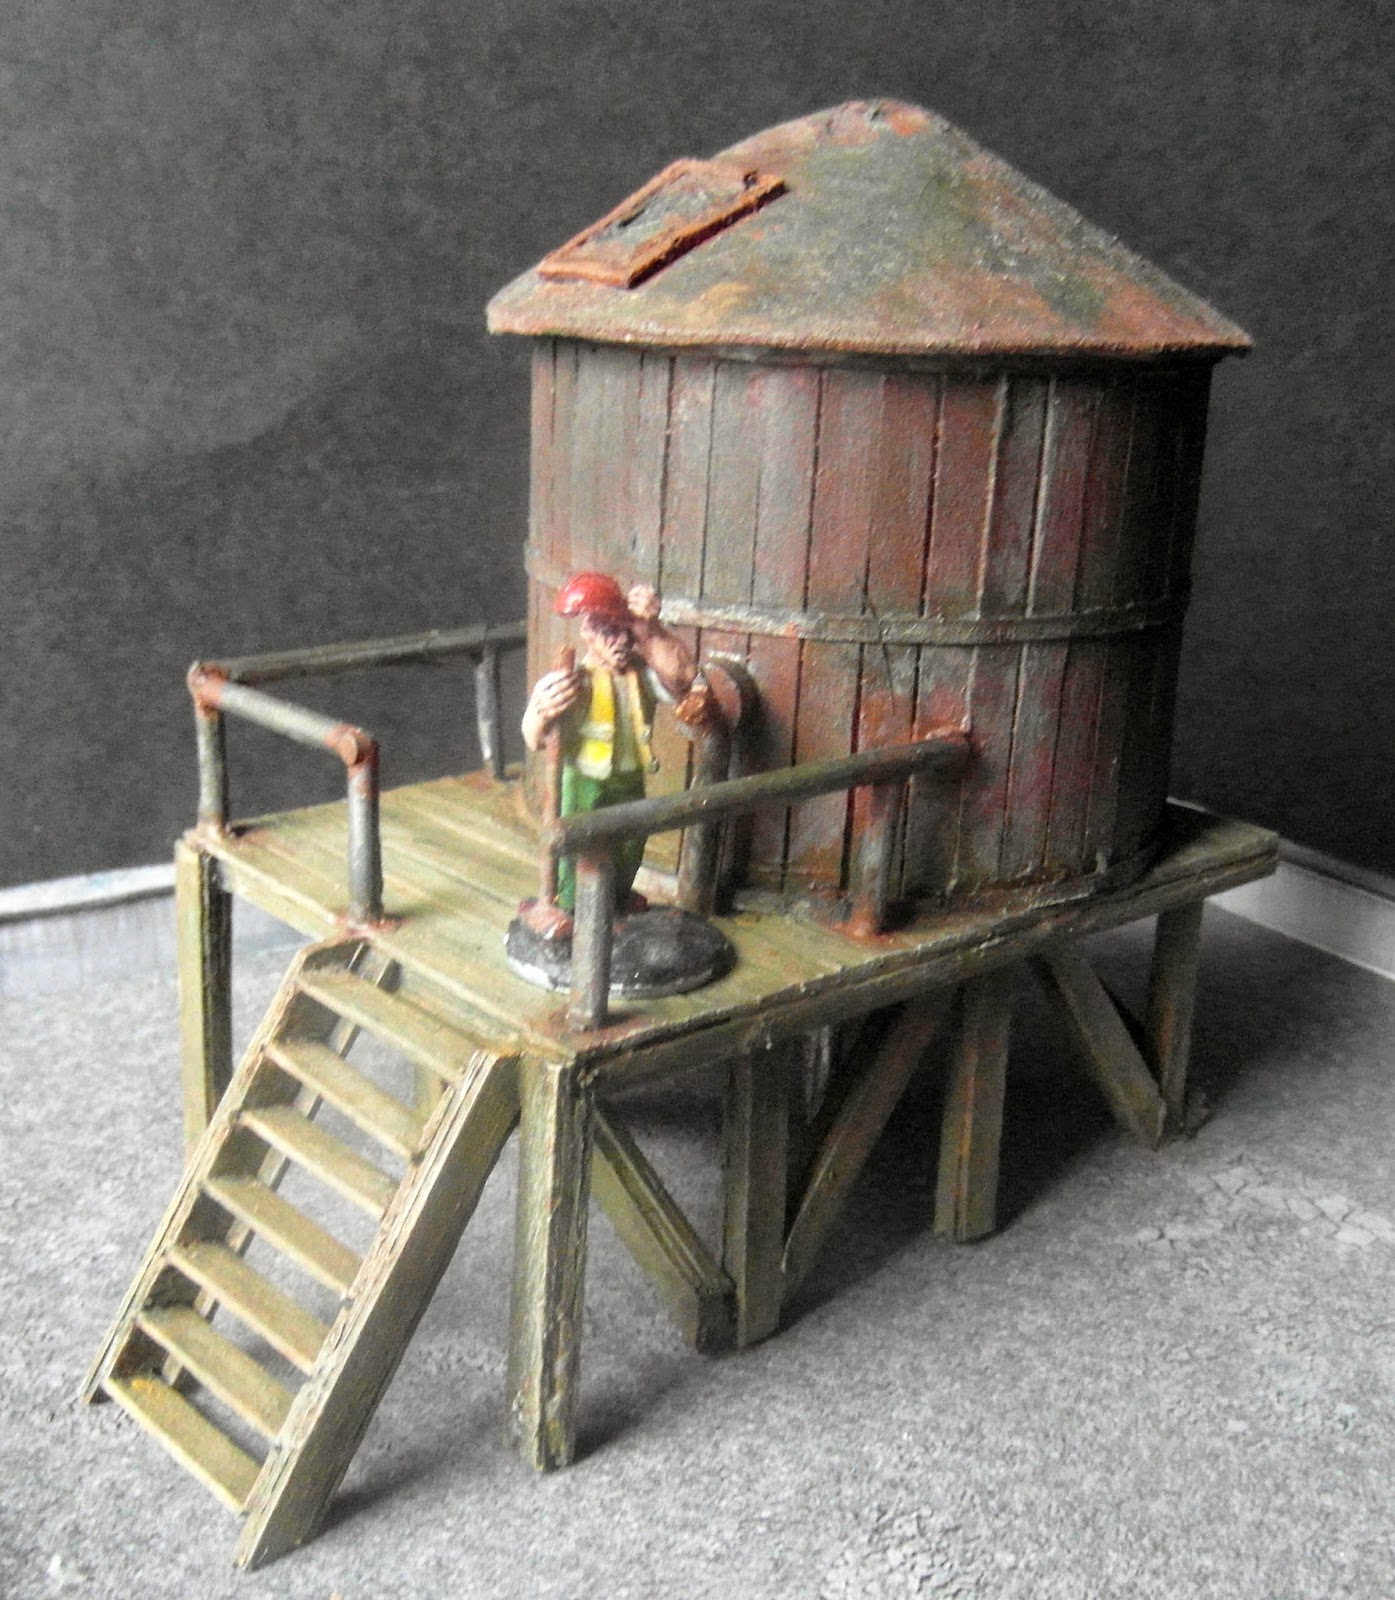
Water Tower

Well I don't have to ask "Can you see what it is yet ?" as the title tells all.
I cut the gravy tube  into two, about halfway down the cylinder (it's about 5" tall and 3" diameter), giving me two pieces, the one on the left (with the internal base) is the one I selected for the tower, though the other was also retained.
Original 'pot'


The two pieces were tidied up with a file to level out the rough cuts and then sanded  a bit. As the rough bit would be hidden by the roof I didn't worry too much about it.
Next, I counted out 60 coffee stirrers as I was interested to know how many I would actually use for this  build and promptly set up about cutting off one end of each. I tend to only cut one end to save time, as I know that I'll be cutting the other end at some time too.
 The next step was to glue the stirrers as close together as possible around about three quarters of the base after scoring and roughing up the base with a craft knife. The latter step is to give a bit more purchase for gluing the stirrers.
When set I snipped the excess pieces off, made easier by having the gap already there for just such a purpose.


Some of the parts cut off were then glued to the 'gap' and were also snipped off. For variation, the second tower had a piece of corrugated card glued to the outside of it (having scored the surface once more) just in case I was in the mood to make another (I wasn't).
Whilst the two tower's glue was drying, I started on the platform that the tower would sit on.
It's made entirely of coffee stirrers of course but there are four layers of them, making a substantial beam. The width of the platform is about the same size as the base of the tower but the length is the base size plus sufficient room to fit a figure or two.
just for information, I use Evo-stick wood glue for nearly all my coffee-stirrer related builds.
 More coffee stirrers were glued and laid across the platform, and you'll note that the ends of these were not snipped off as I knew I would snip these of afterwards, saving a little time.
 The photograph on the right shows the platform about three-quarters of the way through gluing the decking on, whilst the second photograph  shows the platform after completing the decking and trimming it.

 The underside of the platform was next to receive attention with the addition of six supporting legs (I increase this to eight later in the build) and the first of a series of cross beams.
You can easily see in the photograph that for the beams I've used a thickness of four coffee stirrers, which is usual for most of my beam-type builds.
Square-cut length of trim could also be used for this purpose and would save a lot of time, but each would have to be cut with a saw; I've found I can snip two thicknesses of stirrer easily and only resort to a saw for more layers. (I'm also a skin-flint and hence I use coffee stirrers)  


 The left-hand photo shows the jumble of legs and the need for the whole assembly to be filed down and sanded.


  The tower itself was next to be glued to completed platform and some detailing was added at this stage.
First off let me say I have no idea how these tower operate, nor do I claim any knowledge of what they actually look like, so I just added bits and pieces in a pseudo-random way.
The left hand side has a pipe added from sprue whilst the front right has some sort of pillar with gubbins attached, also from sprue (from the Wargames Factory Survivors set if memory serves).
The inside of the tower I wanted to also have a couple of pipes from its centre to the base of the model and they can be just seen in the 'legs' picture above.


A hole was made in the rough centre of the tower and a corresponding one in the platform below the two pieces of sprue selected for the pipes were glued into a piece of foamboard that was in turn glued to the inside of the tower as can be seen in the photographs.


I needed some sort of access to the platform, so I made a quick set of stairs, using some of the offcuts from the various bits of stirrers I had lying about.


With seven or so steps cut to width as accurately as possible I assembled the whole into something passable as a staircase.
I also added two backing strips to the assembly, which not only gave it extra strength but also made for a better join when it was added to the platform.


With the stairs in place I next added some sprue railing to platform; you can see that one of the legs was very crooked, but I had run out of suitable bits by this time and I just left it as a 'feature'.
Next I turned my attention to some detailing and the all important roof.
  For detailing, I added three bands of card to the base, top and the approximate centre of the tower.


For the roof it would be a cone, made from a circle of card cut from the back of note-pad (it's soft, thick and pliable, so very suitable for this purpose. I used a paint-tin fro the circle template of the cone, found the centre of it and cut larger and larger segments until I got a height of roof I was happy with and I also trimmed about 5mm from the circumference.
On the inside of the tower I glued bits of scrap then curved them slightly inward, these would act as supports for the roof, rather than just relying on the edge of the tower.

With the roof in place, I added a hatch from scrap card and painted it silver but goodness knows why as I was going to spray undercoat the whole thing anyway.
As mentioned previously I added the two extra 'front' legs; for some reason I didn't think the overhanging bit where a figure could be stood looked right - go figure.
With the front legs being the last actual modelling to be done was finished and it was then on to undercoating and painting.
I used various browns, reds, blacks etc to get the overall effect I was looking for and whilst it may not win any prizes, I'm happy enough with it.
Dimensions are Platform 4"x3" and 1.5" tall.
Tower 3" diameter, 2" to eve of roof and 3" to apex.


So there it is then a water tower, the sort of thing I imagine on the roof-tops of many a US building. Both fat-Dragon and WorkdWorksGanes have tower amongst their models and I did take some inspiration from them.  My best calculation is that I used 90 coffee stirrers for this build (about 20p's worth) and maybe 50p's worth of glue all the other materials being scrap. Together with paint this probably cost in the region of £1 to make but it did take a fair bit of time. I'd started it in early December and did a little each day, completely finishing it well before Xmas day. 

I'd like to welcome my latest follower the author Todd Brown of the excellent "Dead" series of books, and others, but more of that next week.
That's in then for this week except to say that as always that your comments are both welcomed and appreciated.


Monday, 29 December 2014

Post Xmas Post

New scratch build project starting point
Well, the seasonal holiday festivities are over, the requisite family duties have been completed and another year looms on the horizon.
I feel that haven't really accomplished much though on the hobby front but have managed, more or less, to keep track with most of the blogs I follow as time permitted, including one I have recently started to follow "Outbreak- Gaming the Zombie Apocalypse" hosted by Chris and "Project Z" hosted by C Wheeler, bothof which are well worth a look. There are a few blogs out there too which I really like but don't comment upon (sorry guys) due to my phobia of "Google +" (sorry guys) and if there are any more out there that I missed and that want a shout-out, just let me know.


As for the coming year, I have scratchbuilt a new model using the item in the photograph and I've been building two more box-buildings (no interiors) thanks to a Xmas present of 10 sheets of A1 foamboard. All the buildings are just about complete, save for a few minor details and I'll be posting about them over the next few weeks. I've also been adding some details to the yards I recently made, with piles of rubbish and so on being added as well as finishing the paint-jobs on them, so although I may not have been very productive I have managed some small bits.

 That's it then for this week, I hope you had a good break and have a pious and somber New Year.


Monday, 22 December 2014

Pre Xmas toys

"You've been naughty I hear"
Firstly let me wish all my wonderful followers, lurkers and the occasional wary visitor a very happy Yule, Mithrasmas, Winter Holiday etc.; in any event I do hope you enjoy the break.


 Over the last month I've accumulated some more toys and things for my collection from various sources, but all very useful as far as I'm concerned.
Firstly I got a very large tanker donated by No.1 son, as it was too big for his road wars project. It may be a tad under scale for my zombies, but it's big enough as not to be noticed as can be seen by Sid alongside it.
Now, Grandson No.1 is obsessed by cars, and I wanted the caravan from the "Car and Caravan" (Teamsters I think) as the car is just a bit too big for my liking, so I purchased (shock horror) the set from Wilkinson's (£4) and split it, making two very happy bunnies.
It'll probably end up as part of a trailer park or similar, but nevertheless another bit of scenery.
A Xmas shopping trip for decorations with SWMBO ended up with her buying me this ! (Yes I know it's unbelievable, but it's the season for this sort of thing)
It was marketed as another Teamsters model but the car is smaller and the caravan is different, so I was doubly pleased.

 The same shopping trip saw me once more being bought yet another toy, which as can be seen is yet another Wilkinson's buy.
Its fairly large (1/43rd probably) but not so much that it's too noticeable.
The tunes it plays and the flashing light it has were immediately disabled.
Unlike the other vehicles, this one did have opening doors and rear hatch as shown by Sid.
The car and caravan cost £3 whilst the Ice cream van cost £2 (!) which I thought was a bargain.
"
"Opening door wow !"


A recent trip to the local Poundland turned up these bikes, not in the toy section but in a "part goodies" section. They're probably meant as fillers for kiddies party loot bags.

They are a bit on the large size of heroic for 28mm figures as can be seen in the photograph below, but if you put on sunglasses and squint they fit in quite well, besides at 20p each I won't be complaining.


My collection of vehicles has necessitated another tray to accommodate  these latest arrivals and they're still a bit cramped.
 The tanker only just fits in !
Last but not least and possibly taking first place in my 'finds' is this ball of plastic grass.
These are normally to be found in aquariums and the like but can be particularly expensive and generally smaller than the one show,
It's a ball of about 6" (15cm) diameter and splits into two halves. The individual bits are push on pieces with four bushes each connected by a small ring of plastic.
What is the most amazing thing about this ball of plastic goodness was the price which for £2 was a steal imo !
There was also another variant of 'grass'. looking much like clover, same price, same size but I thought it more suitable for fantasy games (I just know I'll probably regret the decision not to purchase one later.)
There was also a bigger size available but I thought it would be overkill.
The picture shows just how many bits I got from half of the 'ball' and each of the bush parts shown has four individual pieces. The road board
they are shown on is two foot square, which gives you an idea of the coverage attainable.
The frame they came off can be seen in the top right of the photograph and I immediately though that it had possibilities for conversion to a radar dish.


The photo on the right shows the individual bushes on their small circular bases.
They are very plasticcy and could probably do with a paintjob, but they are usable as they are imo.

Just in case you were wondering where I got this from, it came from B&M.


 I couldn't just buy these and do nothing with them, so I quickly put together this little piece from foam board scrap and filler with a dab of paint.
The brick wall bits were left over from my park build and the bush pieces were all cut from their base. so the whole thing took less than a hour to complete.


 I think I've picked up yet another follower but for the life of me I can't determine who it is- if you're out there and want a shout out (especially if you have a blog - just let me know).

That's it then for another week, I hope you have a wonderful time over the seasonal holidays and as always it's your comments that keep a lot of us bloggers going so as always they're welcomed and appreciated.

Monday, 15 December 2014

Meteor Store

Not to be confused with any other store of a similar name
This is a model that I've had in mind since December 2011, but at least I've finally got around to making it. I did intend to have an interior for it, but I need some "filler" buildings and couldn't face detailing yet another interior.
Some of my UK followers may recognise  a similarity with this store and a recently defunct chain of stores of a similar name - it's purely coincidental I can assure you (ahem).
Twilight Street building from Set 1
My model started out life as one of the very fine "Twilight Streets  - Heroic Scale" card models from "Microtactix" - (purchasable in pdf form from "Wargames Vaults, $10 or about £6.5 for seven buildings).
Front of building
My model is a slightly larger version of the original as I photo-shopped it into a more substantial building and from the front at least, a more symmetrical looking building.
The building has been increased in size along the front by just one width of upper floor windows and similarly for the sides (an increase of one window width.)
The footprint of the converted model is approximately 11"w x 8"d x 6"h (about 27cm x 20cm x 15cm), whilst the original is about 1"-2"shorter, but the height of the building (to the parapet is the same as the original.


Boring side view.
  The side of the building, is pretty unremarkable, but I did add one of my signs.
I re-scaled the shop signs in three sizes, the one above the front door being the smallest and the roof-top one being the largest.
More interesting rear view,


The rear of the original store hadn't got the shuttered entrance that can be seen on my version, that was cut and pasted from another of the buildings in the same set.
The sign is of course one of the larger scaled signs that I had made.
The other, equally boring, side wall
My version, the basic four walls and roof took about an hour to put together.


All the signs aren't actually flush with the walls of the building they all have a single coffee stirrer strip (what else) to make them stand out a little way from the walls.


 The supporting structure for the sign on the roof, above the front of the building was made entirely from coffee stirrers and took quite a while to complete due mainly to the drying time. Luckily I was working on the last two "triple" yards for my tenements at the same time.


Finally here's a shot of the roof "furniture", the access door is part of the model but the HVAC unit came from one of the many extras that come with the set.


I have also been continuing my work on the yards and have completed both the "triple" yards I needed to complete them.


Next week I'll be posting some of my latest toys and a couple of exciting "finds"but that's it then now for another week and as always, your comments are both welcomed and appreciated.

Monday, 8 December 2014

Yards

A "single" unit yard
With all the fencing completed it was time to assemble the various parts.
All the fencing now had a slender base, which had a small amount of filler added plus a sprinkling of sand to get some sort of scenic effect.
You'll notice that I've also added corner posts , for added strength.
"Double" yard and the "single" one   


The "double" yards had the same treatment as the smaller ones, with the same basic scenic basing and the addition of corner posts (made from four layers of coffee stirrers)

There was one other element to take into consideration and that was that all the pieces had to align with the wall of the building, which meant a bit of filing here and there.
 Two shots next of all the units I've made so far.
They don't look like they take up much space when intertwined together and laid like  this (before undercoating obviously)

But It's a different matter when you see them separated out.
Each section of fence is about 4" (10cm) long whether it's a plain fence or a section with a gate, so that's 26 sections so far or about 8'6" (about 2.5m) of fences ! A lot more than my original estimate of about 6', it does make me wonder how much it would have cost in plastic !


After a very quick paint-job (unfinished at present) I decided that these would need a base for them to sit on and so I could glue some scenic items in them.
They sit on very thin card with a piece of scrap foamboard that will fit underneath the building they're against and prevent them from drifting around the table during play.
The single yard (top left in the above picture) with a few bits added; its base is hardly noticeable even at this stage, without anything being done to it.


Similarly a "double" yard , on its base, which is tucked under the building.


And just in case, if you're wondering where all these will be stored, here's a picture of a possible answer.


  I have got two more building to make yards for both of which will require three yards each and because I've ran out of stirrers I've resorted to using my very limited supply of old lab tapers (the sort you would light a Bunsen burner with  - "when I were a lad")


Exactly the same methods was employed  as with the coffee stirrers except because of their length I could get 4 sections of fence from them rather than the three I got from the stirrers.
The two final units will be done sometime in the near future, as I have all the bits ready for them but I've also started a very simple building (a box) which should be at a stage where I can post about it next week.


That's it then for another week thanks for taking the time to look and as always your comments are both welcomed and appreciated.


Monday, 1 December 2014

Paling Fencing and Gates

Gate assembly on the left, fencing on the right
For my urban environment (but also useful for suburban and rural ones too) I decided I needed some substantial fences rather than the ones I pretty much flung together for a rural games nearly a year  ago (here). The ubiquitous coffee stirrers would of course be the mainstay of the construction materials along with some better wood glue (Evostick) than I used last time .
The basic method I used was to glue the stirrers (with one of the rounded ends cut off to a strip of coffee stirrers (two stuck together) as the base.
To reinforce the fences I would glue another glued two-piece coffee stirrer at about 5mm from the top.
The picture on the left shows the approximate method.
The "uprights" parts of the fence are about 40mm and I can get two strips of fencing from a single length of stirrer plus another length of 50mm.

The gates are made in a similar fashion to the fences. They are three coffee stirrers wide, have a height of about 35mm and are reinforces with the double thickness stirrers (I made a lot of these).
The photograph on the left shows 4 completed gates and another nine gates in the making.
I would be making 16 yards in total, so I needed a lot of doors and I had estimated about six feet of fencing ( I was wrong)


Strip of gates

A strip of gates in the making.
These started similarly to the ones above and have had the bottom 'strip' of gates cut from it.
The gate strip just needs to be cut vertically apart for another four doors.
The horizontal pieces are a single thickness of stirrer.

The gates cut apart
The four doors in the pictures above.


The gates had some scrap of stirrer cut and added , this gave added strength  and a bit of detail.stirrer.


Several different styles of gate


The gate posts were two pieces of double thickness coffee stirrer glued either side of the 'hinge'.
I use several of these four-layered coffee stirrers  for lintels and posts.
The large gate is for my next large model (already in the planning stage).


Hinged gates with posts.


The picture shows the gates with their respective posts cut to match the original one


Assembled gates
Assembling the gates took a lot of patience, filing and waiting around for glue to set.
I found it almost impossible to use clamps on them too which didn't help.

 For the fencing either side of the gates I would need some shorter fence pieces too, so more were assembled using the same methods as the first lot.
In the picture the horizontals seem to be crooked but they haven't been glued on yet and are there to merely support the uprights on the base whilst they stick.


You're probably thinking that it doesn't look like I made a lot of fencing, but the picture on the right shows the top third of every section (the 50mm fences) and for each of those there were two 40mm sections!
Those of you with better eyesight than myself can spot the ruler at the foot of the picture showing the length of fences (about 14inches by 3 and a bit rows)  I've made. So about 7 feet of 40mm height and four feet of 50mm height, which combined with all the gates and posts I made I reckon I've gone through well over 300 stirrers  and maybe as many as 500.
Finally for this week here's two gate assemblies.
They're both rough and ready, but do the job imo.
The one on the right has a stirrer base attached, that will be trimmed. I've included this not for stability, but again for strength. The left and right fences of the gate assembly are
fairly flimsy and need more reinforcement.
I'll also use the lip of the base to add some filler.

That's it then for this week, I'll be showing some of the completed enclosures next week.

As always, your comments are both welcomed and appreciated.