Welcome to my blog, the story of my continuing journey into the World of Zombie Wargames.

Monday 31 December 2012

Well, 2012 finished with a splutter, having been laid up for about two weeks and making a conscious decision not to do any wargaming activity over the last two weeks has enabled me to fully recover (fingers crossed) from my back problems.
I gave up making plans for doing things in 2012 as few if any came off, rather, I winged it and did bit and pieces as well as I could given the effects of drugs (prescribed medication that is) and my rapidly deteriorating eyesight in the latter half of this year. -Hence the picture

WIP - Tenements
For 2013 I still have about 200 figures to paint, (not including figures other than zombie related ones, which could be well over a thousand others), these of course wiull have to wait until I've had my two eye operations, sometime after January. I have about eight buildings in various stages of build to complete and three more terrain boards I'd like to do; I also have numerous wc's to finish. On the plus side I do have two more finished urban terrain boards to put on my blog (probably next week), but that will be the last of my "reserve" blog posts, so I'd better produce something in 2013.
Probably my biggest objective in 2013 is to at least get some games in with whatever I have available, I've just about sorted out which bits of which rules I'll be using and which bits I'll have to alter (I can't envisage having people running faster than vehicles).

Yep, another short post this week, but once I'm back in the swing of things, hopefully my output will improve and I'll finally manage to finish off a lot of the things I've started.

Hope you all have a prosperous New Year and I look forward to reading your blogs and comments for the inspiration and encouragement they give.

Happy New Year Everyone

Monday 24 December 2012

Merry Xmas

Yes, I know it's a bit cliche but who cares, it's Christmas (or Mithrasmas if you prefer).

I haven't read the book shown here but I did think its fairly appropriate and if anyone has read it let me know what it was like.

2012 has been a strange year for me, I've painted more figures and made more buildings in the last year than I have in the last five years, strange how my priorities have changed. The last month though has been very frustrating as my troublesome back has been well, troublesome. It's all but stopped me from producing anything of note foir week. Couple that with my rapidly deteriorating eyesight (soon to be remedied thank goodness) it's not been a good close to the year.

The year has however had many, many highlights.
I've made some great friends on the blogosphere and found great amusement and inspiration (in about equal quantities) from the blogs I read/follow.

I do have my favourites of course, but it would be invidious of me to name them (and would probably take forever - and nop doubt I'd miss some). My complete list og blogs I follow can be found in my profile.

Just to finish off, then, to my two new followers Headologist and Alvaro and all my regular followers, friends and lurkers Have a very Merry Xmas, here's hoping you're not on the naughty list.

Happy Holidays Everyone.

Monday 17 December 2012

More Urban Terrain

Although I've been unable to paint or do much these last few weeks I have managed to wield a three inch paint brush and to finish off some more terrain boards.
On the right can be seen my latest board and  it's obviously a car park.
The photograph shows it to be much brighter than it actually is (it's the fault of that rubbiush cameraman - again).
The board is 600mm x 600mm and the technique for making the whole thing is exactly the same as the previous boards I did.

The photograph on the left  shows the 3mm MDF with the cork tile pieces gluing in place, whilst the right-hand photo shows the masking tape applied for the road and parking-bay markings after the inital painting of the oarways and pavements. The road-width is the same as my previous road widths, namely 100mm as are the widths to the entrances/exits to the car park. The bays themselves are 100mm x 50mm. Pavements (sidewalks) are 50mm wide. As my eyesight has been deteriorating very rapidly these last couple of months I haven't been able to manage any of the "SLOW" signs or any directional arrows that might be expected on a terrain piece such as this, but hopefully this will be rectified in the new year.

So, a bit short this week and just in case I don't get time to get another blog done next week (there seems to be some sort of festivity going on), I'll take this opportunity to wish all my followers, lurkers and friends a very Merry Xmas.

Comments, as always,  are both welcomed and appreciated.

Monday 10 December 2012

Mish-Mash

"More bloody rubbish"
Well, today as the title suggests is a mish-mash.  I've been able to do next to nothing new these last few weeks due to my back problems and have had to rely on using material that I've previously made and this week is no exception, except that I've all but ran out of past "work".
Sid the Sweeper, shown on the right,  is  looking over two mattresses that I'd made at about the same time as my beds, but they missed last week's photo session. I was reminded of them by another Bloggers post (http://rogzombie.blogspot.co.uk/) showing casing his Black Cat Bases' fly-tip scenery. It was made in the same way as my beds - namely a piece of foamcard covered in tissue, the only difference being I rounded the corners off and I was a bit more careful gluing the tissue.

When looking at various blogs I tend to get side-tracked and look at the blogs others follow and this last week was no exception. I was very pleasantly surprised to find a model I'd built about 15-20 years ago being used at "Claymore 2012" in the League of Augsburg Borodino Game on Davestoybox blog (http://davestoybox.blogspot.co.uk/2012/08/borodino-at-claymore-2012.html).
The model in question is the church, not the village and it left me with a warm feeling reading his comment:
" The gorgeous Russian church was scratch built and bought by Barry many years ago but has hardly been out on the wargames table which is such a pity for a lovely building."
There's also an excellent close-up of the model on :  http://wappinshaw.blogspot.co.uk/
The materials used were card and what may appear to be the ubiquitous coffee-stirrers, but are in fact tapers (known as spills in this part of the UK), used to light Bunsen burners in the days when children were allowed to light Bunsen burners ! 
 Whilst looking through the various Claymore pictures I also noticed another model I'd made for Durham Wargames group about 10 years ago, but for the sake of me I can't find the blog or site where I spotted it. Nevertheless, here's a very old photo of the model. It's a representation of the citadel of Troy based on a drawing in the excellent book "The Ancient Greece of Odysseus" by Peter Connoly. (Published by Oxford University Press.) Its footprint is about 1200mm x 600 mm I think (the terrain boards beside it are 600mm x 600mm)

So, that's it for this week, it's been quite a departure from zombies, but by next week I should have finished a bit more of my Zombie-project.

Comments, as always, are both welcomed and appreciated.


Monday 3 December 2012

Beds and Backache


These last few weeks I've been fairly incapacitated with back problems, necessitating large periods of time lying on my back to recuperate. Progress on my zombie project has been next-to nothing, but a couple of months ago I made the prototype for some beds I would be making. Since then I haven't had the opportunity to show the progress I made with them, until now.
The top two photographs show the prototype (and a WWG bed) and the batch of beds I made.
Construction of the all the beds followed the same pattern, more or less with a bit of variation here and there.
The body of the bed was a piece of foamcard, though any similar material would do, corrugated card or cork tile for example.
This was wrapped in a piece of tissue. I used both toilet paper and kitchen roll as they have different patterns on them and are very useful aids to detailing the models.
The headboards and foot boards are a piece of card with a short bit of matchstick glued about 1cm from the base, this will support the body of the bed. For the pillows I rolled some tissue into a "sausage", glued and cut it to the size of the pillows I needed. For the sheets and blankets the tissue was cut into a strip about the length of the bed them wrapped around the bed and glued in place (mostly on the underside of the bed's body ). This phot shows some of the tissue texture and the rolled tissue used for pillows.
Not all of the beds I made were in pristine condition, looking like they had just been made, because that would have been fairly boring, even if a little easier to do.
I found that having to design different headboards for variation much more of a pain and I ended up with quite a lot looking very similar, if not identical, but it doesn't really bother me.
What does bother me, the bit I don't really like about having made all these things, is having to paint them !
 Here's as far as I got painting them, before boredom set in and I had to move onto to something else. The idea is that I'll finish of individual beds as I need them, they mostly need shading highlighting and varnishing.
I'm really not that creative with my colour combinations  and en-masse they all look very samey, but individually I think they're OK.
Currently painting of any sort other than with a three inch brush, has had to be put on hold as my eyesight  have deteriorated enormously in the last nine or ten months,  probably due in no small part to age and accelerated by the medications I'm taking. So, in the next two months or so I expect to have two operations which should enable me to see what I'm painting once more !

That's it once more for this week it only remains for me to welcome my latest follower Shintokamikaze - "Welcome !".
All comments are, as ever,  welcomed and appreciated.

Monday 26 November 2012

More Rubbish

"It's going to take ages to move this lot."
This week I'm showing how I've  made some of the detritus I've used on my models.
I've used these sacks on a couple of models (garage and bins); they can add a bit of detail and interest for very little effort, which I'm all in favour of.

A can be seen in the photograph to the left they all start out as strips of newspaper, torn to apporximate size.
I've then added what I think is a cigarette filter (I've had a box of these for years and never figured out what they were).
The advantage in using something like the filter is that they are all of a uniform size and hence the sacks will be very close in size too.
After a touch of glue to the length of the strip it is then rolled into a tube and left to dry. I use UHU  (£1 for a big tube from Poundland) for this which dries very quickly, but I would think any paper type glue would do.
Once dry (or fairly dry) I then put a drop of glue in each end of the cylinder and nip the ends together to get something that looks a bit like a wrapped sweet.
Once these have dried out I trim the ends to get what is in effect the final product.
The various stages can be seen in the photograph, I've included the set-square to show the relative sizes of the start to finish.
The ends can be left as they are if you're going to use the sacks horizontally or one end can be pushed flat if they're to be used  vertically. (Both can be seen in the photograph at the top)
The half a dozen or so prototypes I made also had a small blue label glued onto them (cut from a newspaper classifieds), but I thought this to be too much of a faff when making lots of them.

The sacks were given a quick paint-job of yellow ochre highlighted in white to get to the stage where I was happy enough to declare them "done"

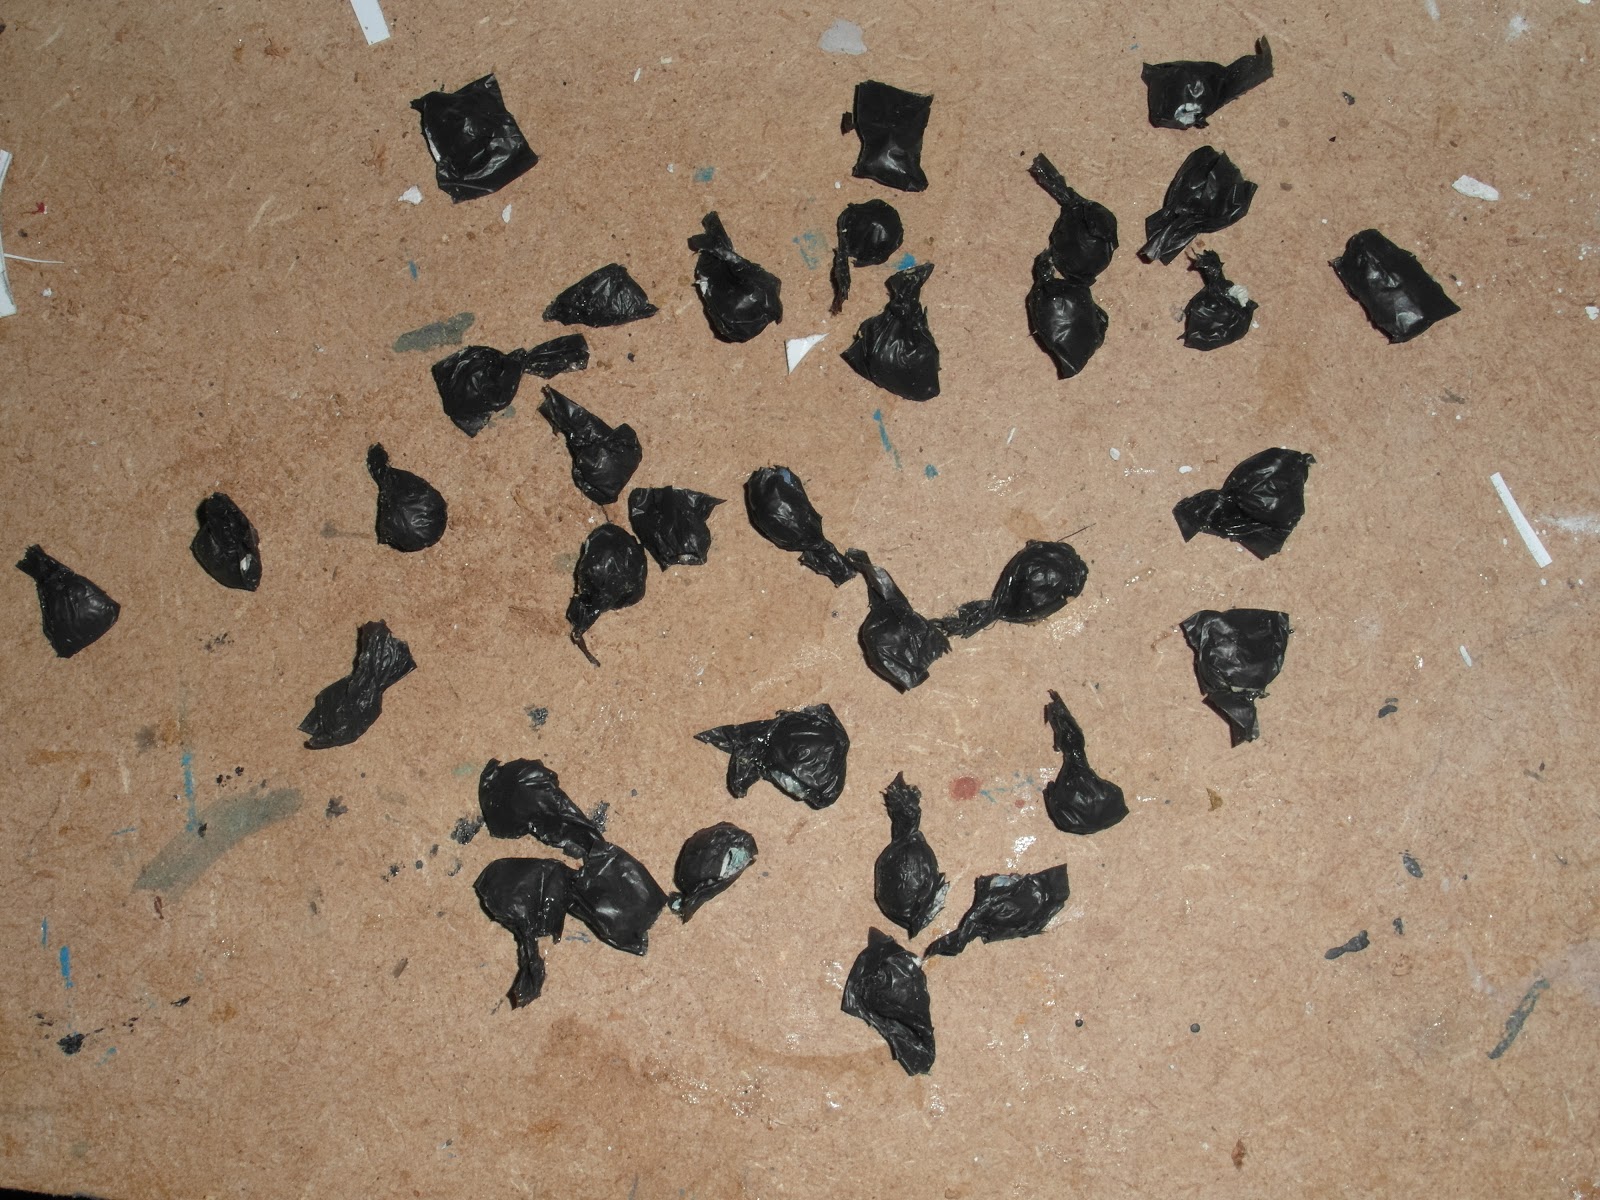
When I was making my rubbish bins, I wanted  to represent the black plastic bin-bags which are so prevalent in the UK and I presume from TV evidence the USA too.
I had thought of using the same method as I used for the sacks but this would have lead to a too uniform sack.
For the first attempt I used a strip of newspaper with a rolled ball of newspaper glued to it. The strip was then folded  and glued. Next I had to paint the whole thing a gloss black which was very messy and time consuming and so was abandoned for those reasons.
The next method was to use actual plastic bin bags as the base material. I cut a strip about 30mm around the top of the bag then cut that strip into more manageable lengths of about 150mm, as can be seen in the photograph above.
I then glued small balls of newspaper to the strips (as can be seen). The whole 150mm strip was then glued and folded over, giving the impression of peas in a pod (sorry no photo- my bad). Before the glue was completely set the individual bags were cut from the strip and the top given a twist. Like the sacks some of the bags had to be given a final trim to finish them off.
What I thought to be an interesting spin off from this was that not all the bags glued well and there was some of their newspaper content showing.
I was quite pleased with this and left them in that state after trimming.
I think the total time to make all the bin-bags you can see in the above photograph took about an hour, as did the sacks, (in addition, painting the sacks took some time too). I didn't think the bin-bags needed any painting though they may well get some when they're added to a model.
For more rubbish I decided that having newspapers would be relatively quick to do and could be quite effective. I used two or three of these newspapers in my rubbish bins.
This was a very time consuming task and not one that I would want to repeat in a hurry.
I used my Google-Fu to come up with numerous newspaper front pages and some pages that could be used as their backs or content.
They then had to resized and transferred to one sheet, which, although not difficult, was mind-numbingly boring.

The headlines can actually be made out, though you wouldn't think it from this photograph.

The block of front pages that can be made out, can be glued to the block of back pages directly below it if carefully cut out. These in turn can be cut out individually, as required.
The sizes of the various newspapers vary slightly but are generally about 1cm by 2cm, which to scale is probably far too large but they look ok to me.
The other "newspapers"  shown are generally just a front and a back which can be cut out as one, glued and folded.

No ,matter what searches I put in I couldn't come up with more than one Zombie style headline, the force just wasn't with me the night I did this.
I could of course, make my own headline up and attach them to fake newspapers of my own but the time that would involve just doesn't seem worth it for the result.


Well, that's it for this week, my work here is done, except to welcome my two latest followers, Bacon Fat and Oli. and as always comments are both welcomed and appreciated

Monday 19 November 2012

A Load of Rubbish

Late at night I sometimes get good ideas, but most times I get some rubbish ones.
This post is about one of the rubbish ones.
Having cover available is always  a good idea for survivors and I needed to get more things to act as cover for my games.
 As a consequence of this line of thought I made four of these large rubbish bins.

They're all identical in size (more or less); approximate measurements :
Length 65mm,
Height (at rear) 40mm
Height (at front) 30mm
Depth 30mm 

Bin number one, shown here has no major features, save for a small poster  stuck on one side.
I really should have put some stencilled lettering or some such on the bins, but frankly I didn't think it worth it.

"Lazy B's"
Bin number two has a small pile of garbage dumped next to it and again is really nothing remarkable.
Sid the Sweeper shows the relative scale of the models and they're all a tad oversized, I think that they could have done with having about 5mm less height.
The wooden board beside the bin was a left-over from my lollypop crates but has had a wash of brown over it.
I'll be making some more bins in the future and whilst these bins are of the "two-lid" variety, the next ones will be smaller, with a single lid.
Bin number three has its lids open because of all the rubbish jammed into it.
I think we've all seen this sort of thing at some time or another and it adds to an otherwise fairly boring model.
"At least there's nothing around the back"
The bulk of the rubbish is a kitchen towel which then had all manner of bits and pieces added to it. Just wiping my hand over the table I work on gave me enough small bits to sprinkle over the glued towelling.
I couldn't really start to say what all the other bits are, but there is mdf, paper and bits of stick  in the debris.
The last bin, bin number four, I actually put a little extra effort into, which I hope can be picked up.
As can be seen, one lid is again being forced open by garbage, whilst the second lid has actually been snapped off, bent and left in place.
The bin bags were an experiment and are actually of two styles.  I was so pleased with these that I made a lot more for future use, they'll appear in a future blog. Also in this bin you should just about be able to make out one of my sacks (top left corner), which have proven to be quite a useful and quick detail to add to a model, as they can represent anything from a bag of cement to potatoes or sand.
There are also a few newspapers to be seen amongst the rubbish. The newspaper fronts were all gleaned from the web and I made up an A4 sheet of these with corresponding fake backs.

These particular models never actually made it to "WIP" status as they were all completed in  about six days with about a hour's work done on them each day. The back and left side of each of these bins was purposely left devoid of detail as I wanted them to be easily abutted onto the walls of any building.
Whilst they may look a bit rushed, there's a good reason for that (they were), but they're usable  and in my opinion don't look too bad (If you wear sunglasses, dim the lights and squint - Ed.) and they could be just the place to find that  two-by-four for your improvised weapon against a zombie !

That's it for this week, thanks for taking the time to look and as always, your comments are both welcomed and appreciated.


Monday 12 November 2012

Cottages (3) & Zombie Me !

"This is going to take more than a brush to finish"
"We're going to need more bricks"
It's a bit of a fraud really calling this particular effort a cottage because although the model is finished (more or less) it isn't really a complete cottage - the image explains all I suppose.
It was worked on in between the times when work had come to a stop on my other cottages, whilst waiting for things to dry out generally.
It wasn't particularly difficult to make as I didn't really have to be that precise (and I wasn't taking it that seriously). I did get frustrated at times though fitting the  spacers for the studding type walls.
The style of the building more or less follows the same general layout as the other two cottages, with more or less the same dimensions.
I wanted to have sufficient details that it would be recognisable as a version of the other two but I also didn't want it to be too far in its development so to speak.
Many years ago I actually worked on building a holiday chalet on the South coast of England and I recalled that the chap I was working with  said that the door frames and windows frames would be fixed at a later time (they were very much off true whilst I was there)
"At least this door frame looks square"
I'm guessing that most people reading this will already be aware of the materials used (at least for all the wood bits).
The base is a scrap of plastic, the bricks are foamboard and the pipe is made from a 25mm plastic tube cut  longitudinnaly (though not parallel to the edge). The "concrete" foundation is also cut from scrap foamboard. Some wall filler (ready mixed pot from Poundland) was used for texturing the base.
"That wall's never vertical"
All the wood bits were, of course coffee-stirrers, the uprights being several stuck together. The ramp was made from two pieces of lollypop sticks.
Whilst I could have built up the back wall to make more of a barricade as cover for any survivors to hide behind, I opted instead to leave it fairly open and make some removable barricade style elements, which could be used
"I'll never get all this mud cleaned up"

for this model and for general use.- they're nothing special.
This next photograph show a bird's-eye view of the whole thing and shows both the ramp and the pipe in situ.
This view also shows how much space there is inside for figures (and if necessary barricades), which I prefer, rather than filling the inside with more detail - which is not that difficult really,  given that it's meant to be a building site.
Here's a couple of views of the interior showing what little internal detail there is for each end of the building.
Both the fireplace end and the pipe end show mud and concrete splattered walls (but in reality it just shows that I'm a crap painter), they do though give a good view of the ramp and the pipe.

Finally here's an improvised barricade made from the various bit and pieces that I've been working on.
 The sacks shown, I've featured before, though sparingly and I was so pleased with them that I've actually made a lot more and made a couple of stacks of them, which of course can be used as improvised barricade for figures. They'll feature in a later blog along with other minor stuff that I've been working on.


In other news:
Work on the cottage interiors has all but come to a dead halt as real life intervenes, but I have managed to do some other (easier) things, so all progress hasn't halted.
It has also been mentioned before, on many blogs that I follow and particularly amongst the Zombie Community Bloggers about the generosity of others within the community and this last week was no exception as I received a small parcel from Slovakia. For fear of embarrassing the sender I'll not mention Mattyoo's name. The parcel came on a day when I was feeling fairly ill (normal for me atm) and cheered me up no-end.
It's a great figure of Zombie-me, ready for my zombie campaign, but one I hope I don't have to use for myself !  I hope my photo's have done it justice. (Should anyone else want to send me painted figures I can provide a list and even the bare metal !)

Well, that's it for this week it only remains for me to welcome my newest follower, "Brovatar", I hope you find something here to interest you.

All comments are, as ever, welcomed and appreciated.


Monday 5 November 2012

The Bicks' Place (Cottages #2)

This is actually cottage number 3 in the grand scheme of things, (if you remember from last week cottage #2, being built by my friend, has gone walkabout).
I rarely name my buildings (or figures for that matter) but this one's naming just had to be done.
Unlike the first two cottages, majority of the "planking"  on this one came from a "Weetabix " cereal packet, rather than coffee stirrers.
The reason for using the cereal package card was because I was going to overlap the "planks" clinker style and the stirrers would be too thick to easily achieve this
The photograph shows Sid (of course) for scale at the front of the building.

 These next two photgraphs show the main differences in cladding between the first two cottages.
Card planking on the left and coffee stirrers for cottage number one on the right. Card laid horizontal and overlapping  whilst the stirrers are laid vertical on cottage one.
The "shell" of the building is made in identical ways for both cottages, but for the horizontal planking (and roof tiles) I mark lines 5mm apart as a guide.
Here's the extension that can just be seen in the above photo in this side view of the cottage.
The decking on the front and side of this cottage was made from coffee stirrers rather than card, for strength.
The main part of the building is a comparable size to the first cottage whilst the extension is an additional 8cm x 8cm (approximate).
 These two photographs show my construction techniques, such as they are. I tend to roughly cut the excess materials off first, then I make a neater cut later (you can see a very ragged edge on the far eave on the above left-hand photograph). 
The right-hand photograph shows a birds eye view of the building, with the base being a single sheet of card, larger than basic size of the building, it doesn't show the doorway connecting the front of the building with extension particularly well.
Here's the rear view of the cottage with a small garden type area utilising that bit of the base.
The materials that the fencing was made out off will be obvious; it's 25mm from rounded top to squared off bottom and is actually glued to the edge of the base (so that the base of the fence is flush with the table surface) and is reinforces with two longitudinal pieces.
The corner edges of the building were all made with corner bits of the Weetabix box, so that there was already a fold in the card.


 The final side of the building is not much to write home about as there are no real features unique to this side.
The final side of the building is not much to right home about as there are no real features unique to this side.

I have actually made a start on furnishing the interior of the two building as well as starting some other minor projects.
Here's the two cottages side by side for comparison and finally Sid with my latest "minor project"  prototype.


As Rolf Harris was apt to say "can you see what it is yet ?"


Whilst I haven't managed to make any great progress with my tenements they can actually just be made out (on shelves) in the background of the first photograph
Next week I should be ready with cottage number  4, which is a bit different.


So that's it again for this week I hope that you've found something here to interest you and as always all comments are both welcomed and appreciated; lastly I'd like to welcome my latest follower "Darkoath.