Welcome to my blog, the story of my continuing journey into the World of Zombie Wargames.

Monday 30 December 2013

Happy New Year

(This is my 101st post - in case you were wondering)
As 2013 draws to a close it's time to reflect on the year and it's highs and low.
For me the year started with my eyesight rapidly deteriorating, which was no fun at all but by September and two operations later I my eyesight fully restored.
My enthusiasm all year has been up and down like a bride's nightie with the inevitable down sometime around the end of November when any pretense of enthusiasm for blogging and gaming in general hit an all-time low, but this has since been lifted somewhat by just one or two recent comments on my blog and replies to my own comments on others' blogs.
Over the last two years of blogging I do feel that I've made several new friends in the Blogging community, which is a strange thing to say considering that I've never met but one of them.
The highlight of the year, as hinted at, was meeting Matevz or Mathyoo as many of you will know him as.

Without Bryan/Vampifan's, Matevz, and many of the regular commentators to my blog I think I would have given this up a long while ago.

In 2014 I aim to game more, once the batteries are recharged and the enthusiasm for it returns.


(These are not mine, the  picture was "borrowed" )
On to the Xmas haul, which on the Wargames front saw me the proud recipiend of a Full Thrust Fleet (FSE for those that know about these things). I blame Colgar6, and his excellent bat-reps that overflow with his enthusiasm for everything he does. The present came from eldest son who has his own fleets for the game and probably recollects from his childhood playing this game with me. It is a bit of a diversion from Zombie gaming but a very welcome one at that.
All was not lost though on the Zombie front as I did receive some related items.
From the overly generous Lord Siwoc I got a rather bulky pack of mantic Ghouls as a prize in his rather unsubscribed Xmas competition.
Expecting one or two sprues worth of Ghouls, my jaw dropped when I opened the package to a veritable feast of figures. When I get back to painting Zombies, I can see these being combined with some Wargames Factory zombies.
It's been quite a revelation to me blogging, just how generous fellow bloggers are, this was not the first competition I've won and I've also been the recipient of other gifts too!  This is surely one of the most wonderful communities to be a part of.
Worst Dice roll ever ?  (Picture again "borrowed"_

With that, it's time to wish you all a very happy and prosperous New Year and here's to another enjoyable year reading your blogs, making new friends and maybe even meeting a few more of you.


As always your comments are welcomed and appreciated .

Monday 23 December 2013

It's that time...

...of year again, when we lose several days of lives to do next to nothing and over-indulging
(hopefully) in everything from things  that are either not good for us just plain silly.
So, are you celebrating the birth date of Mithras on the 25th or maybe you'll be participating in fertility rites involving druidic sacred Mistletoe (yours was cut with a golden sickle right ?). It might also be that you're setting fire to a pagan yule log to warm and light you through the winter darkness,  or bringing in a Germanic tree to decorate.
 Whatever it is you do at this time of year (you may even just be enjoying the holiday period like normal folk do with family and friends) I sincerely hope you enjoy it.
I'll also take this opportunity to thank each and everyone of you that has read or commented upon my blog. Without all of your participation in my wonderful bloggosphere experiences over the last two years, this my 100th blog post, would not have been possible, so once more, thank you.

Monday 16 December 2013

Trees

The demise of our local "Model Zone" shop saw my eldest son buying up trees, more than he could use so I ended up being the beneficiary of one bag of trees, with somewhere around 18 trees in it.

The trees themselves lay dormant in their bag for a few months before I finally got around to seeing what I could do with them.

My original intent was to use a couple of them in the park that I built, but as those of you who saw the finished park that idea had gone out of the window. 
 I decided to dig out my old trees and base them up with the new ones I'd acquired from my son.
The few, still "usable" trees that I dug out were in a very sorry state as can be seen by the photograph on the left. It's no wonder the state that they were in considering that they're probably over thirty years old and have been through many, many tabletop battles.

I did think that they were salvageable though and with a generous amount of PVA glue and flock (some of which came from the bag the new trees occupied) I think I made a reasonable job of rescuing them from obscurity.
The result of my efforts can be seen in the photograph on the right. The flock I used is probably just about as old as the trees and is a mix of home-made and commercial (I think).
It only remained for the new trees to be mounted on irregular shapes bases of differing sizes and the refurbished old ones to be interspersed amongst them.
I mounted all the trees in multiples of two, three or more trees; the bases were chamferred and given a coating of wall filler for texture and painted in greens and browns.
The final outcome wasn't as shabby as I thought it would turn out and the 'rescued' trees fitted in well enough for me. (The tree on the right in the first photo is one.)

Although the whole process took quite a while and I was plagued with problems over getting the models and paint to stick to the bases (goodness knows why), I'm quite happy with the result 

That's it for another week and as always your comments are both welcomed and appreciated.

Monday 9 December 2013

Fences

For my next scenario, set in the suburbs of Perdition I required some extra scenery as most of my stuff so far has been of an urban nature.
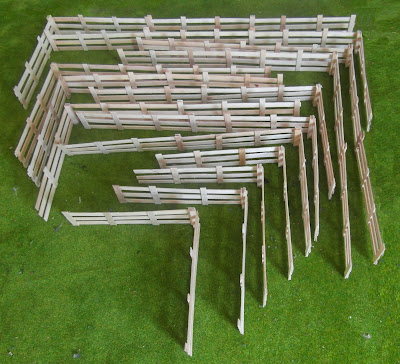
So whilst working on my park I was also working on some bits of scenery too. Although the fences are probably more suited to a rural environment than a suburban one, they're still another addition to my scenery.
The obvious choice (to me at least) as the preferred material to make these with was of course coffee stirrers.

 For the initial preparatory stages I cut coffee stirrers to a length of about 120mm and then laid them out as shown.
They're about 25mm from the bottom of once fence plank to the top of the third,
The pile of "posts" that can be seen to the side are 30mm long.
One central post was glued in place initially to easy handling before the second was put in place.
 To join two lengths of fencing together another post was glued between the two fence pieces.
  As can be seen on the photograph to the right I used a lot of clips/clamps to hold the pieces together whilst they were gluing.
To reinforce the join, a second 'post' was glued to the other side of the fence, this can be most clearly seen in the photograph at the top of the page (in the middle centre).
Some of you will no doubt have noticed that there appear to be a lot more fences in the third photo than those laid out in the second one. Five fence lengths makes about 60 cm (about 2 foot of fencing)
 and my initial estimates of what I'd like were woefully inadequate so I ended up making about about three times more than I initially thought I would.
The photo on the left shows the second 'batch' of fences getting to the same stage as the first.
At what would be the corners of my fences I glued a post made up of four of the post length that I'd cut earlier. This gave me a good surface area to glue one length to another with some purchase and it also made the fences free standing .
The various lengths were glued into 'L' shapes; the smallest 'L' shape was 1 length by 1 length (1x1). I made others of 2 x 1 lengths, 2 x 2 lengths and 3x1 lengths. The pieces with a single length at the corners were made in two versions, a left hand one and a right hand one.
The photograph shows the finished models in their unpainted state. I still haven't got around to painting any of them as my enthusiasm for this particular project diminished rapidly as I thought it would be quite a quick and easy process - how wrong I was !
 I had made just over 40 lengths of fences which, including the corner posts and fence joins used up about 200 coffee stirrers!
 This gave me a total fence length of about 16 to 17 foot of fencing (about 500cm) but still seemed inadequate when I came to use them on 6 foot by 4 foot of my table.
The use of the free-standing fences should be fairly obvious from the last two photographs and the varying lengths used against buildings does provide a good representation of a perimeter.
I have found though that  really should have made some provision for some gates in the overall scheme of things.
Instead of gates I've had to leave a gap in the fence lines as a temporary measure and by trying to use a free-standing fence I'm unable to make a simple straight length of fence, which is a bit frustrating.
This was one of those projects that I thought was a good idea at the time but I do wish I'd thought it through a lot more before starting out on it, but on the plus side I do have some extra terrain even if it is limited a bit in its use.

And that's it for this week, except of course to welcome  my latest follower "Alexis Gayaud" and to say that all your comments, as always, are both welcomed and appreciated.

Monday 2 December 2013

The Park

Well, here it is finished at last, or at least as finished as it's ever going to be !

The first photo shows a general view from the rear, but shows all the major features in place.

The two picnic tables I used have had a bit of clutter added.

The plan view shows how the completed model fits into one of my standard urban terrain boards, even if the entrance is actually off-table ! (Just for the ease of taking  the photo.)


The playground next, showing it embedded into the grass mat, with some muddied bits.

I cut the grass to accommodate the foot-prints of the three bits of equipment, so that they didn't appear to be floating on top of the grass.

I did repeat this for all the benches too and ended up using all eight of them.

The slide had a 'fun' poster added.
The other half of the park, used as a picnic area.
The picnic benches were not glued in place, but left free-standing and even though I could have used all four benches that I'd made, it looked rather crowded and left little room for figures - something I'm always aware of when making any model.
Even my figures' 20mm bases take up  far more room than they should.


   Another view of the right hand side of the park showing the rubble mess and two of the four bins that were all used in the mode. (again these were embedded into the grass).

As the picnic tables are loose, they could be replaced with a stand of trees or something similar.
 Close of the bin, nearest the monument, showing the various bits of tissue, plastic etc that I used.
The rule in this case was less is more insomuch as I put lots of small bits in the bin (and a newspaper to top it off).

Close up of the monument, nothing spectacular, just glued in place.


The newspaper in the corner was the only extra bit of detailing that I added to the  final model.

I could have been added a lot more in the form of rubbish but I though this sufficient.


 Another view of the park from the rear, showing just how tatty the play area is!


Finally, I have to welcome my latest follower, Robbie Rodiss, who has two excellent blogs (Aut Caesar, Aut Nihil  and   The Independent Wargames Group.), whom I have known for a long time.

That's it then for another week and as always your comments are both welcomed and appreciated. 


Monday 25 November 2013

Some Final Bits (The Park part 4)

Here's the final bits for my park starting with the centrepiece for the central path - a monument.
It doesn't really represent anything other than a generic monument and I could have attempted some engraving on it, but the effort involved I thought wasn't worth the return.
I'd also thought of putting a statue on the top of the plinth but this would have added greatly to the overall height of the model and would have been just another bit that could be broken off.


The left hand photo shows the structure of the pieces, two layers of  cardboard sides with the base and steps of plastic. I wish I'd thought to use a slotta-style base for the top of the model.
It's a very rough and ready model made in about an hour on a whim, (I had originally planned a small fountain or flowerbed) and with a quick thin wash of filler and some hurried painting I decided that it had had sufficient time spent on it for what it  was.
Next up were some benches for the park, which again were fairly quickly made (I was getting quite bored with this model by now).
The benches are quite simple affairs, just slatted seats and a pair of supports. The slats are of course coffee stirrers, cut in half lengthways and then cut in half widthways too. The overall length of the seats is about 50-55mm.
The supports are scraps of plastic cut to a rough trapezium shape. The base of the support is 1cm, the top (supporting the slats) is 15mm and the height is a mere 1cm.
I thought I'd need at least four, but made the "extras", knowing that some would turn out better than others.
Next up was another one of those "I wonder if I could make" moments when I thought about waste bins as an added detailing feature.
I cut a strip of mesh (the car repair stuff) and wrapped it around a spile marked at 20mm to make a cylinder. The mesh was then pressed into place to make a cone and finally the bottom pieces were were pressed flat too.
(The spile is the cork like looking thing in the picture, used on the top of beer barrels to let air in).
The rubbish bins were painted black and had various small bits of paper and plastic glued into them. The base was also filed flat to sit better on the model.
The final bits I made were as shown, four picnic tables, made entirely from coffee stirrers.
The tops are half the length of a coffee stirrer (about 60mm), as are the seats. The table top is about 20mm high, the seat being about 1cm.
Construction was fairly easy and quick, most of the time spent to finish these was waiting for glue to dry.
They were painted in a similar colour to the benches above, but were given an additional highlight for contrast.
Some minor detail would be later added when they were in situ.
I did think that I'd be using all four in the park, but as things turned out I ended up only needing two for the park.

With the final few features, made and painted up, putting it all together was the next step and that will be subject of next week's blog.

That's it then for another week; I have "Dannoc", a new follower to welcome and as always your comments are both welcomed and appreciated.

Monday 18 November 2013

Playtime (The Park part 3)

The more observant amongst you will have noted that I've actually dropped the wip part in the title, this of course is for a very good reason in so much as I've finally finished the Park !
I do however wish to show the separate bits I've made to bulking the inside of the park.
It was difficult deciding what to include (flower beds, fountains, general greenery all came to mind, but my initial thoughts were for a children's play area. I opted for just three items to be included, a swing-set, a slide and a see-saw. I thought these would be fairly easy to make out of scrap and were typical of a play area.

 The slide is entirely made from thin card but has a core of polystyrene in the solid support.
I went for a solid stairs end mainly for ease, similarly with the support rails for what really should have been typically been iron stairs (or similar).
I did miss out on a trick that I only thought about afterwards in that at the top of the slide I should have built some form of platform, this would have enabled me to have placed a figure at the top. The slide's current width of  about 20mm really prevents this.

The second piece of equipment is a see-saw, made from various bits of scrap plastic; the central cross-beam is a bit of sprue, suitably filed down.

This was another one of those models that I'd started and wished I really hadn't. It's so small and fiddly to make it look right.
The base itself is not a single piece of scrap, but two pieces glued to the central upright for added strength.


The final bit of equipment is the swings set.
The frame of this is again two bits of identical right-angled sprue glued at what looked by eye to be an appropriate angle.
I had enough space between the angles to get two actual swings in the gap without it looking complete pants.


 The slide was given a wash of filler over the rear steps before painting started.
 The pale green slide, turned into the garish yellow and green slide before I opted for the red and blue slide you seen here.
As in all my models the bright cheerful colours I had settled on were then abused with washes and splashes of various browns to represent the wear and tear of neglect on a rusting playground.


 The see-saw had two holes drilled into the upright pieces and paper clip handles, cut to size, glued into them.
Again the yellow and red turned to blue and red and was suitably "weathered".
I'd decided that the base would be painted to represent a dull concrete for contrast, rather than a rusting metal plate.
Little did I know that when starting the swings, what a veritable pain in the posterior attaching the actual chains to the uprights and the seats to the chains, would be.
The chain is from a cheap bit of jewellery, kindly donated by SWMBO (knowingly, if you were wondering) and the seats are more sprue.
I think I probably spent more time putting the chains and seats on this than I did making all of the above. The chains were eventually superglued into stiff lengths (thus it's not a working model).
Once more weathering was applied to the blue uprights (its original intended colour).

Once more that's all for this week. Next week's blog will show the elements that finish off  the Park's internal bits, featuring, once more, the use of coffee stirrers (just for Clint ).

As always your comments are both welcomed and appreciated.


Monday 11 November 2013

The Park (a wip part 2)

The work on my park has been carrying on apace even though I went through my usual lethargy half-way through this project.
As can be seen from the photograph I added some greenery in the form of two strips of grass-mat (courtesy of my son) on  top of which I put two pieces of very thin soft card as templates and cut out the bits of "grass" that were beneath, the card was then glued in place.
The sections of paving on the card were inscribed using a very sharp pencil, rather than a craft knife and were then very roughly painted-in using a dark brown. You can see my usual practice of using a part of the model as a palette (in this case the front step !).
The paving area was decided upon after a great amount of thought after many other configurations.
The next picture is to show the pathways after two coats of dry-brushing.
The first was the darker of the two ("Wholemeal"), whilst the second was a highlight of "Sandstone", note the step has now ceased being used as a palette, that honour being taken up by the centre of the square in the top of the model.


The photograph on the right shows two hedgerows I added as a small bit of detailing (also giving some cover for figures, be it slight).

The hedgerows are made from rubberised horsehair, beloved of many wargamers, back in the day, when "Snickers" were called "Marathons" (bit like this project - a marathon)
I ripped them from their card bases and gave them some added life with some pva glue and flock on just their upper 'surface.

 
To complete the 'terrain' part of this model I added the fallen masonry inside the park walls.
The bricks came from my pot of cork bricks, suitably coloured to match the foamcard walls of the park. The broken top pieces of the wall were the actual bits cut from wall.
There still needs a bit of mud and dust added to complete the effect of course and this will be added when the completed model is "weathered", which in my view s a necessity as I really don't like pristine looking scenery.

Next week I'll be showing some of the internal bits I've made for this model and I'm currently trying to finish the final pieces before the final assemblage comes together, but I still keep coming up with bits I'd like to add !

And that's it once more, as always your comments are both welcomed and appreciated.

Rememberance

Today is Remembrance day and even though I've actually not left my house in the last few days, I've still worn my poppy with pride and observed the two minutes silence with respect.

I hope you have too.


Monday 4 November 2013

The Park (A wip part 1)

The walls that I featured in last week's blog were the start of my next large project, namely a park.
For the base for the model I used a sheet of 5mm plastic, as it would give some rigidity to what I think will be a fairly fragile piece when it's finished.
On the first two photos you can see lots of lines and writing on the base, these are in fact a 1:1 scale plan of my Superdupermart that I built a while back ! 
The second photograph shows best what the strange fort-like cut-out is intended for - the entrance.
The pillars I'd made were glued into place on the sides of the base whilst the shorter walls were glued on top of the base and the taller walls were stuck to the sides of the base. The walls had to be cut to size between each individual pillar (not very accurately !).
On top of each of the walls I then glued an additional strip of 5mm foamcard with the top layer of card stripped away.
The tops of the corner columns also had another piece of card glued in place on the tops and then the foamcard squares that I showed last week were fixed on top of those. These squares I found were 5mm too large and were cut to size, once in place.
The column tops and walls were filed down to give a curved appearance and the final touch was a small plastic 'BB' ball glued to the centre of each column. A thin coating of filler was applied to all of the of the columns and the tops of the walls.
The next stage was an undercoat of tester paint from the DIY store (Wholemeal !) applied to all the brickwork. I also glued a thin piece of plastic as an additional step into the park (Sid is standing on it in the photo above).
The brickwork was painted next, staring with a very dark brown stippled randomly, followed by a slightly lighter brown, Although this doesn't really show in the end product it does give a better look to the brickwork imo and is worth the effort.
Next I dry-brushed a very deep red across all of the brickwork  followed by another dry-brushing of a more 'brick-like' red.
To finish off the effect, once thoroughly dried I applied a dusting of white filler across brushed the whole of the brickwork using my finger.
This appears on the photograph much harsher than it actually is.
The tops of the walls and pillars had a wash of dark brown applied and then success layers lighter brown highlighting applied.
The two photographs show the grass effect applied inside the model and a green terrain board the model  is sitting on - note the variation in greens even though its the same model in both pictures!
I've showed the only detailed feature of what would have been a very bland looking perimeter, a broken section of wall. This was not a mistake that I incorporated, but just something I dreamed up whilst making the model!

This venture has now been a month in the making and is nearing completion, but has a little more still to do on it. I have started on some of the internal features too, but I have been greatly distracted by trying to make other things for my next scenario, all of which will feature sometime soon.

 That's it for another week, as ever, your comments are both welcomed and appreciated.


Monday 28 October 2013

Brickwork and Walls

So as part of my next model project I needed a perimeter wall, I've been experimenting with mesh fences but have gone instead with more brickwork, after my demolition site model.demolition-site model. As an interim blog "filler" here's a brief explanation of how I do my walls.
I needed 3 long walls and several shorter walls for this model and used three bits of scrap foamcard for them.
The walls have to show brickwork on both sides so I've used two pieces of wall glued back-to back.
The internal wall measures 20mm high whilst the outside measurement is 25mm as the outside wall will butt onto the 5mm base of the model whilst the inside wall will sit on top of the base.
The photo above shows the basic wall uncut from the foamboard. I've measured off the walls in 5mm strips horizontally and then sliced through the top layer of card with a scalpel.
Next I ran a very sharp pencil through the scalpel cut to get a rough deep channel through the foam.
The white squares will be the caps of the corner stones.
The final stage, after making 1cm  marks across the top of the sheet, was to pierce the top layer of each alternate strip vertically down through the top card layer and into the foam below, using a larger, blunt craft knife and then repeat for the un-pierced layer, making the brick pattern. This method gives the typical stretcher bond (the way the bricks are arranged) that we associate with a brick wall.
The long walls are about 14" long (350mm) and the short ones were cut to fit as necessary.
I also wanted to make corner posts, rather than have to rabbet the wall corners together and needed another large section of walling with a height of 35mm and a footprint of 25mm so they would stand out. (These corner pieces were a pain to put together).
It may sound like it would take an absolute age to cut, slice and form the individual bricks, but it really took no more than a couple of hours.
The bricks are of course over-sized; in reality to a scale of 1:60 (30mm represents 6 foot) these bricks would be 2 foot long and 1 foot thick and would be OK for stonework, but making anything smaller is beyond my meagre capabilities.

This model is well on the way to being completed and I'll be posting more about it next week, but it is currently only one of several other projects I'm working on, including the features that the walls will surround.

That's it for this week and yet again I must say welcome to my latest followers "Fred Jackson" and "Zombie Ad". I hope both of you and my regular followers find something here of interest.

Finally, as always, your comments are both welcomed and appreciated.