Welcome to my blog, the story of my continuing journey into the World of Zombie Wargames.

Monday 26 January 2015

Dead...The Series

Dead Spring
Over the Holiday period I picked up volume nine "Dead Spring" in the Dead series by TW Brown and of course I wasn't disappointed with the content.
The most striking thing about this volume in the Dead series was that it occurs several years after the end of the previous book "Dead: Darkness before Dawn"
Darkness before Dawn
The first nine volumes of the series follow on chronologically from one another and follow the trials and tribulations of several 'main' characters, none of whom are the spectacular 'superheroes' that I've come to half expect in previous zombie novels that I've read. They do of course become more proficient in dealing with the aftermath of the apocalypse to varying degrees and have many pitfalls along the way.


The Dead series, Volumes 1,2 and 3
Whilst there are many similarities between this series and others that I have read (inevitably I suppose given the initial premise of a zombie apocalypse) this series does set itself apart from others of a similar ilk.
The diversity of the main characters and the fact that you're following several different story lines adds, rather than detracts from the enjoyment of reading their stories.
Dead, volumes, 4,5,6 and 7
Initially, whilst reading through the first three volumes I wondered if any of the , main story line characters (there are three or four of them, depending whom you think are 'main') would ever meet up, as I've seen done in other books. So far this hasn't been the case, but hardly surprising given the vast distances covered by the stories.
The story-lines are, from my point of view, very believable, if a little graphic, especially in the earlier books - but maybe I've become inured to it by the later books as I haven't noticed it so much.
Along with the main story lines there are a number of  'vignettes', story-lines which are dipped into from time to time, but offer glimpses into how the apocalypse is tackled elsewhere.
These 'vignettes' are maybe not to everyone's tastes as they do detract from the 'main' stories but they also give a little extra breathing space to the page turning action of the other plot-lines.


There hasn't been a single volume that has been disappointing nor one that didn't contain some surprise or shock in a storyline, the last volume I read, "Spring", being no exception.
The whole series reminds me of "Game of Thrones", you get to know and love a character, then they're gone ! The death are quite a shock whether they're killed by their own incompetence, at the hands of others or by the ever-present zombies.
I found it quite difficult to get through the first few chapters of Volume one ("Dead: The Ugly Beginning"), but once I was used to the style of writing I couldn't put the book down.
With regard to the latter statement, I should add that I really should have said "put my Kindle" down as all my books are in e-book form.
The books are all available from Amazon, in Kindle form, they vary in price from about 99p somewhere around £3.50 for the latest tomes. However the better way to purchase these is of course in sets, volumes 1 to 3 are in DEAD-Box-Set 1 also for the princely sum of 99p ! (so don't go buying just volume one, buy the first three for the same price !).
I've also purchase T.W. Brown's Zomblog series of books (again bought in sets). There are two series, each of three books and if, like me you like the "Dead..." series then you'll also enjoy these.
No doubt I'll be writing about these too in a future blog post.


 Other than reading T.W.Brown's latest Dead volume in the series I've also managed to fit a couple of zombie games in, nothing spectacular but here's a couple of photos from the pre-game set-up (an excuse to use my recently completed and detailed yards):
Perdition, East-Side slums from the South -East

as above, bu from the North-West.


That's it then for another week except to welcome my latest follower "Chris" for whom I can't find a blog and as always to say that your comments are both welcomed and appreciated.


Monday 19 January 2015

Another Building

My version of the Twilight Building
This week, I have yet another building I've built from the Twilight 'heroic' set, although I don't have a specific purpose for it, but it will be a good generic office/hotel/clinic type of building for downtown Perdition.
Although not the biggest building I intend to make (that will be my next 'box-build' at 6 floors) this is the largest building I've made so far.
It stands at about 12 " tall (30cm), the footprint is about 16" x 11" (50cm x 275cm) making it
I do like to have fairly unique buildings and normally to accomplish this I mess about with photo-shopping the originals.
 Sid in the photograph to the right shows just how big a building this is.
The photograph below shows the original twilight building:
Original Twilight building.
This is almost as large as my own building, but I've extended the front each side of the main front ground-floor windows and I've also extended the side for added depth and of course the rear has also been extended to match the front of the building.
The roof of the portico in the original has this glaring black line dividing the two halves of it, I've photo-shopped this out in my version as I couldn't understand what purpose it served (and it looked naff).
Needless to say I don't have any interior detail in this model, nor do I intend to have any !
Here's another couple of views of my take on this model.
Front door portico


Boring side of building

Slightly more interesting rear of building.
Fairly boring Roof-top view
OK then, it's not that much of a build really, the original came on five sheets of A4 whilst mine used a similar number of A3 sheets. Because of the size of the building, I separated the ground floor off and printed a separate ground floor, which made  aligning the front entrance really tricky. I used the original side walls plain ground floor to extend the front and rear walls too.
The water tower you see on the original comes with the set (as does a lot of signage and roof-top furniture and yes there is a pigeon coop !) and probably gave me the idea for my own that features in the photographs.

In other news, I've been cleaning and basing figures in readiness for painting and I've played a game, (shock ! horror !) all of which I'll be posting about in the future.

That's it then for this week except to welcome my latest follower "Spiro Dotgeek" of the very interesting blog Pants of War and finally, as always, your comments are both welcomed and appreciated.

Monday 12 January 2015

Boneripper's

Close up of front door
In another effort to increase the size of my 'city' quickly I made another quick 'box' building that originally I had earmarked for my "Meteor Store" along with plans for an internal layout.
Well, the plans didn't come to fruition as I had decided that the effort just wasn't worth it, so I decided to make this one more or less "standard".
Once again it is from the Microtactix "Twilight Streets" range   Heroic buildings set and didn't need any re-scaling.

The original (front and rear)
 The original model can be seen on the left and what should be quickly apparent is that my version is slightly larger, by about half as much again in width and depth.


My building, like the original is square at about 9" x 9", the original being about 6" x 6". Both buildings are about 4.5" to the top of the roof parapet.


My Version

I increased the frontage of the building adding a bit more wall of course the extra windows in the second floor  (I do like symmetry)

Boring Side
I wanted something other than another "box" for this building so I added an extra bit of walling , but only one story high. The double door on the roof were a leftover from the Meteor store idea, when this building was going to be three stories high.
Rear of building
The rear was more of less the same as the original except for the bit of wall I added on the ground floor and the double doors on the upper floor.
Rear of building and the other boring side wall
Very boring roofs
The second side wall was a mirror image of the first (of course).
By the time I got to the stage where I was about to add some detail to the building I was very bored with this building. I had had all sorts of problems with it, due mainly to the very old warped foamboard that I had been using  and that for some reason it just would go together well.
The only extra bits I put on it were the side wall posters and a poster on the front door.
I do like this building though (just not my build) and I do think it would be worthwhile giving it another attempt, maybe even detailing the interior and adding some roof furniture.


Next week I'll be posting a far more successful build, that used my Xmas foamcard.

That's it then for another week and as always your comments are both welcomed and appreciated.

Monday 5 January 2015

Water Tower

Well I don't have to ask "Can you see what it is yet ?" as the title tells all.
I cut the gravy tube  into two, about halfway down the cylinder (it's about 5" tall and 3" diameter), giving me two pieces, the one on the left (with the internal base) is the one I selected for the tower, though the other was also retained.
Original 'pot'


The two pieces were tidied up with a file to level out the rough cuts and then sanded  a bit. As the rough bit would be hidden by the roof I didn't worry too much about it.
Next, I counted out 60 coffee stirrers as I was interested to know how many I would actually use for this  build and promptly set up about cutting off one end of each. I tend to only cut one end to save time, as I know that I'll be cutting the other end at some time too.
 The next step was to glue the stirrers as close together as possible around about three quarters of the base after scoring and roughing up the base with a craft knife. The latter step is to give a bit more purchase for gluing the stirrers.
When set I snipped the excess pieces off, made easier by having the gap already there for just such a purpose.


Some of the parts cut off were then glued to the 'gap' and were also snipped off. For variation, the second tower had a piece of corrugated card glued to the outside of it (having scored the surface once more) just in case I was in the mood to make another (I wasn't).
Whilst the two tower's glue was drying, I started on the platform that the tower would sit on.
It's made entirely of coffee stirrers of course but there are four layers of them, making a substantial beam. The width of the platform is about the same size as the base of the tower but the length is the base size plus sufficient room to fit a figure or two.
just for information, I use Evo-stick wood glue for nearly all my coffee-stirrer related builds.
 More coffee stirrers were glued and laid across the platform, and you'll note that the ends of these were not snipped off as I knew I would snip these of afterwards, saving a little time.
 The photograph on the right shows the platform about three-quarters of the way through gluing the decking on, whilst the second photograph  shows the platform after completing the decking and trimming it.

 The underside of the platform was next to receive attention with the addition of six supporting legs (I increase this to eight later in the build) and the first of a series of cross beams.
You can easily see in the photograph that for the beams I've used a thickness of four coffee stirrers, which is usual for most of my beam-type builds.
Square-cut length of trim could also be used for this purpose and would save a lot of time, but each would have to be cut with a saw; I've found I can snip two thicknesses of stirrer easily and only resort to a saw for more layers. (I'm also a skin-flint and hence I use coffee stirrers)  


 The left-hand photo shows the jumble of legs and the need for the whole assembly to be filed down and sanded.


  The tower itself was next to be glued to completed platform and some detailing was added at this stage.
First off let me say I have no idea how these tower operate, nor do I claim any knowledge of what they actually look like, so I just added bits and pieces in a pseudo-random way.
The left hand side has a pipe added from sprue whilst the front right has some sort of pillar with gubbins attached, also from sprue (from the Wargames Factory Survivors set if memory serves).
The inside of the tower I wanted to also have a couple of pipes from its centre to the base of the model and they can be just seen in the 'legs' picture above.


A hole was made in the rough centre of the tower and a corresponding one in the platform below the two pieces of sprue selected for the pipes were glued into a piece of foamboard that was in turn glued to the inside of the tower as can be seen in the photographs.


I needed some sort of access to the platform, so I made a quick set of stairs, using some of the offcuts from the various bits of stirrers I had lying about.


With seven or so steps cut to width as accurately as possible I assembled the whole into something passable as a staircase.
I also added two backing strips to the assembly, which not only gave it extra strength but also made for a better join when it was added to the platform.


With the stairs in place I next added some sprue railing to platform; you can see that one of the legs was very crooked, but I had run out of suitable bits by this time and I just left it as a 'feature'.
Next I turned my attention to some detailing and the all important roof.
  For detailing, I added three bands of card to the base, top and the approximate centre of the tower.


For the roof it would be a cone, made from a circle of card cut from the back of note-pad (it's soft, thick and pliable, so very suitable for this purpose. I used a paint-tin fro the circle template of the cone, found the centre of it and cut larger and larger segments until I got a height of roof I was happy with and I also trimmed about 5mm from the circumference.
On the inside of the tower I glued bits of scrap then curved them slightly inward, these would act as supports for the roof, rather than just relying on the edge of the tower.

With the roof in place, I added a hatch from scrap card and painted it silver but goodness knows why as I was going to spray undercoat the whole thing anyway.
As mentioned previously I added the two extra 'front' legs; for some reason I didn't think the overhanging bit where a figure could be stood looked right - go figure.
With the front legs being the last actual modelling to be done was finished and it was then on to undercoating and painting.
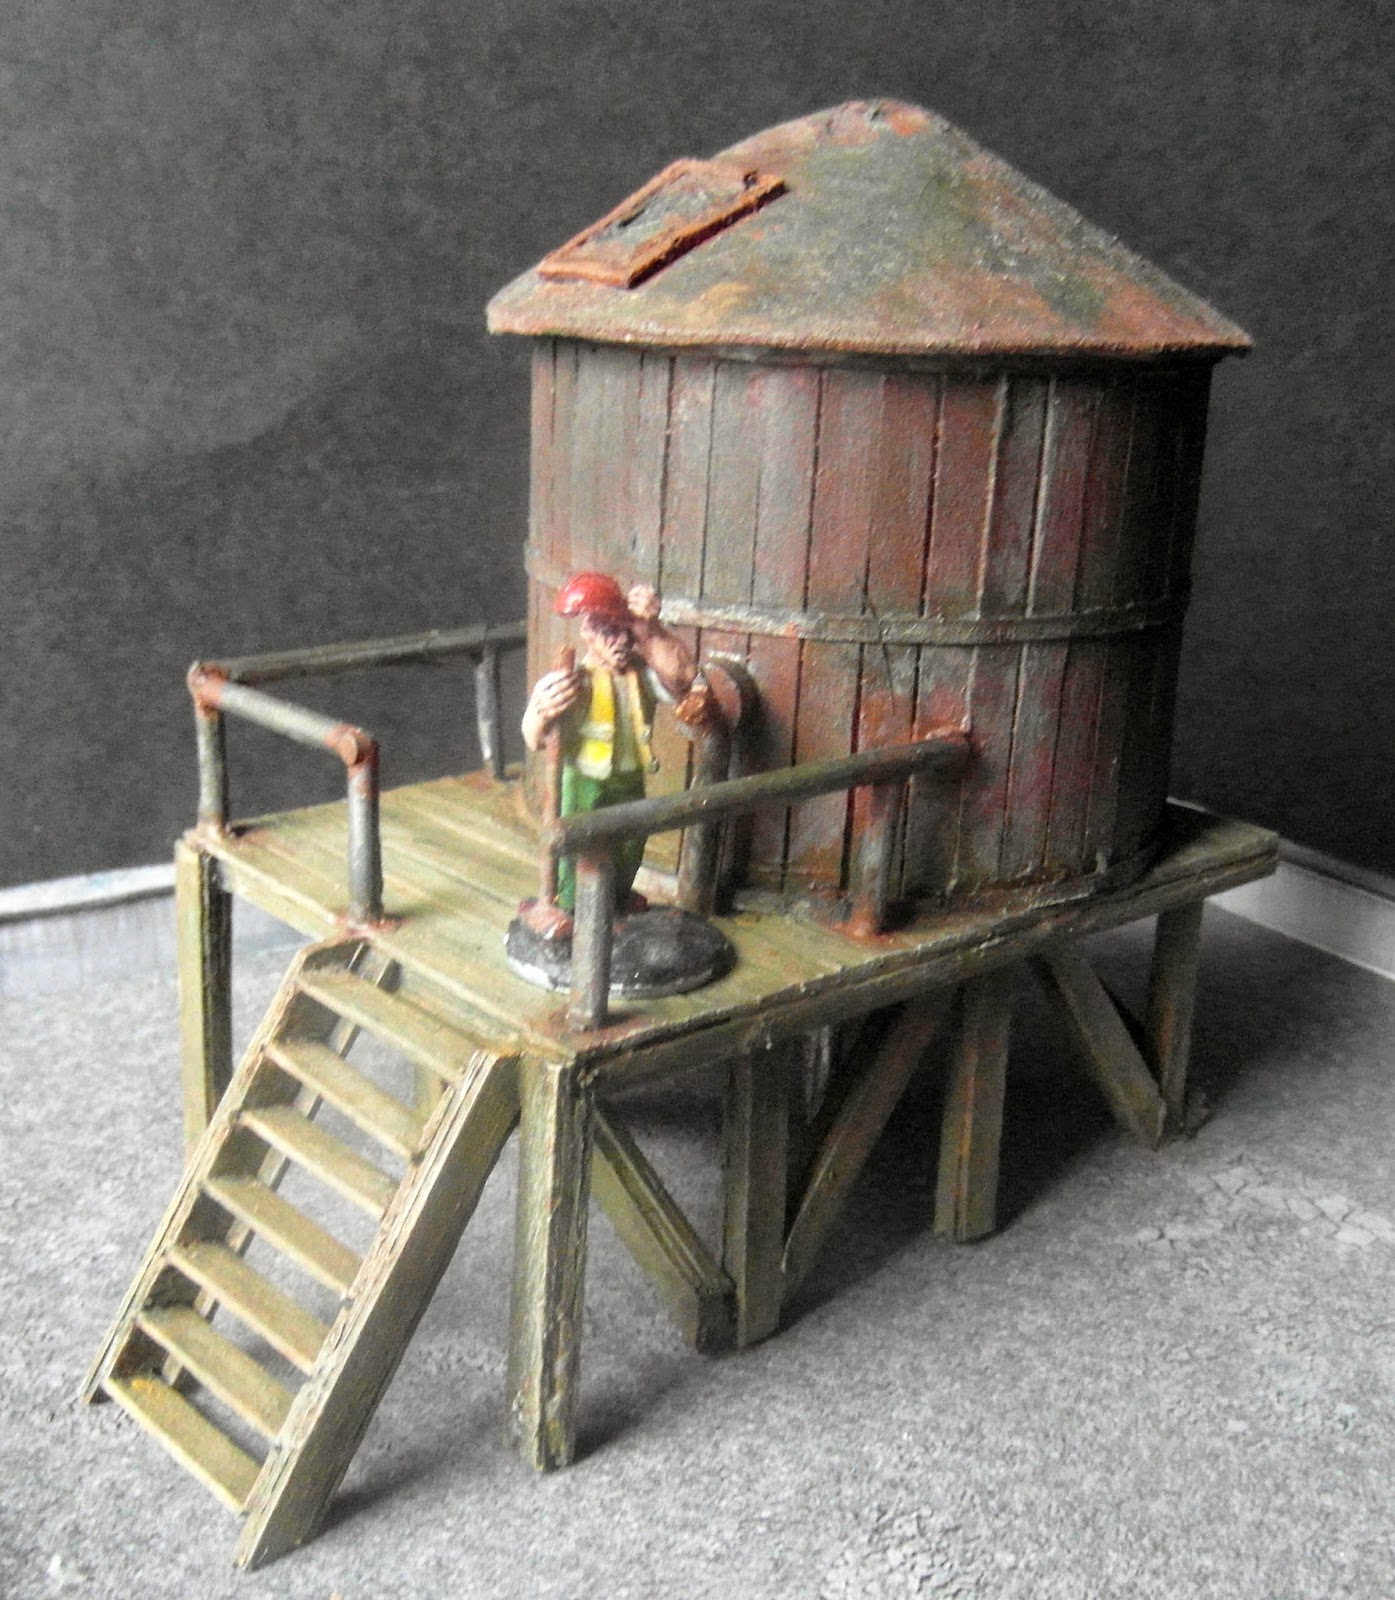
I used various browns, reds, blacks etc to get the overall effect I was looking for and whilst it may not win any prizes, I'm happy enough with it.
Dimensions are Platform 4"x3" and 1.5" tall.
Tower 3" diameter, 2" to eve of roof and 3" to apex.


So there it is then a water tower, the sort of thing I imagine on the roof-tops of many a US building. Both fat-Dragon and WorkdWorksGanes have tower amongst their models and I did take some inspiration from them.  My best calculation is that I used 90 coffee stirrers for this build (about 20p's worth) and maybe 50p's worth of glue all the other materials being scrap. Together with paint this probably cost in the region of £1 to make but it did take a fair bit of time. I'd started it in early December and did a little each day, completely finishing it well before Xmas day. 

I'd like to welcome my latest follower the author Todd Brown of the excellent "Dead" series of books, and others, but more of that next week.
That's in then for this week except to say that as always that your comments are both welcomed and appreciated.