 The work on my construction site continues (slowly); the basic structure has been completed but each stage seems to take an eternity for the glue and paint to dry. It does however give me ample time to make a lot of bits and pieces to fill the site with.
First if the many additional bits that I've made is this site hut, which I showed the initial stage of last week and is now complete. The structure is fairly flimsy, being made from some very cheap scrap packing card and matchsticks.
The use of matchsticks (they're actually bought

The footprint of the building is about 2" x 3" (50mm x 75mm) which gives enough room inside to fit two figures comfortably even with the internal detail I wanted for this.
The windows frames are made from the same card, as is the roof (which overlaps the front of the building by about 1cm).
Even with matchsticks as support for the roof, it still managed to warp a little.

Again matches have been used as vertical support struts more for decoration than any true support worth.
Originally I had painted this building in blue, but realised I already had another fairly similar building in this colour and so It was repainted in green (much darker than the photographs show).
The original blue paint can be just made out on the photos.
Another photograph showing the final side for completeness, note the roof out of place !
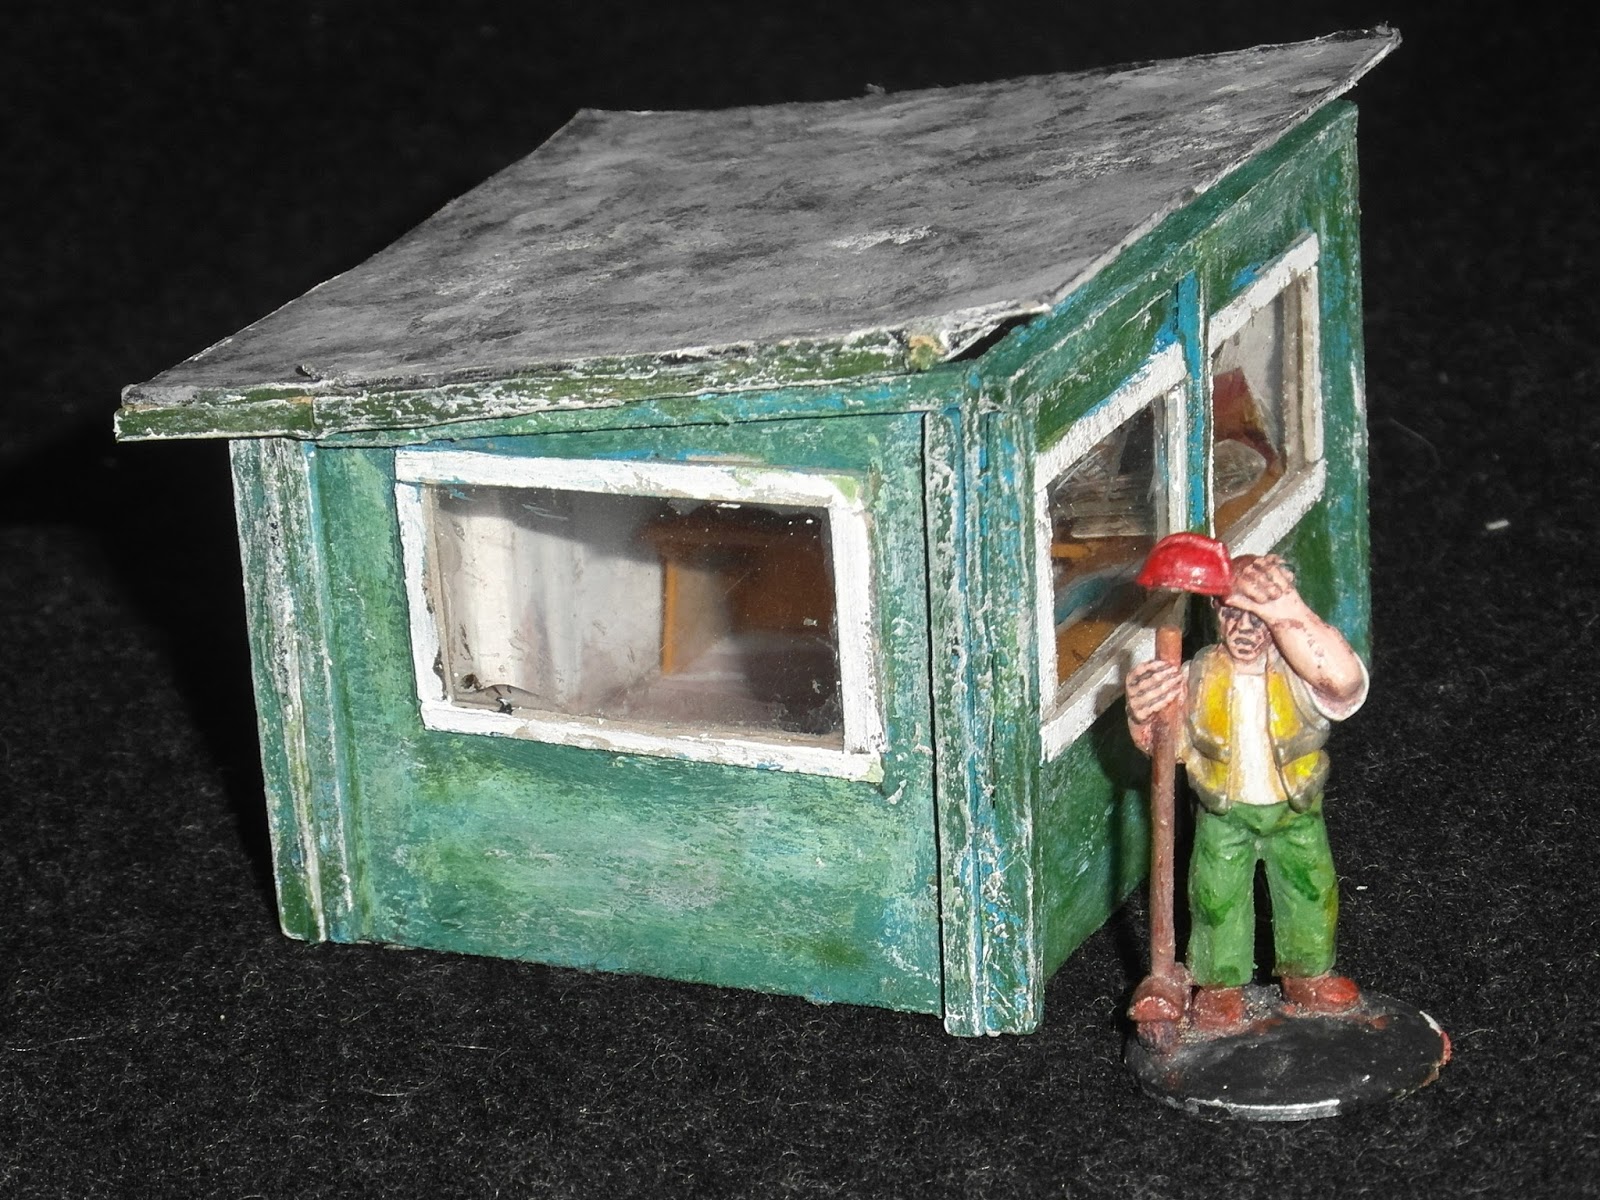

I made the internal detail concurrently with the hut and fitted it after the hut was assembled, so it was a complete stand-alone piece in its own right.
The two chairs I have been messing about with for a few weeks and they're not actually glued in place yet, as I haven't determined whether or not I'll do so.The "blue prints" and the crap of card that resembles a clip-board are the only extras that I made specifically for this.

The rear wall has no detail on it at present and could really do with a chart or a H&S poster or some such as currently it's fairly bland.
The rear wall does have a coffee stirrer edge to the top for extra strength and as an attempt to stop warping.
All the windows have perspex panes to represent glass.
The model overall took a week to complete, but I doubt if I even managed an hour a day on it, as I was making many other bits as the same time.

They may not be the most detailed in the world (Mathyoo), but I'm quite pleased with my efforts.
You can just make out that one of the chiars has a very thin back and seat (card) whilst the other has a thick, cushion-like back and seat, made from plastic.
They were very fiddly to make, but at least I now have an idea of making some passable furniture. I'm also going to try and make a park-bench, using the same technique.
In other news, in case you haven't checked his blog lately, Brian/Vampifan is now out hospital and in a respite home.
And that's it for this week, as always your comments are both welcomed and appreciated.
Those chairs are brilliant. The back wall should not have a H+S poster, but a girlie calendar! You know it makes sense. I like the idea of a very unsafe building for the survivors to retreat to. Temporary and flimsy and not much able to stand up to a determined horde. When you play a game at least one objective needs to be in such an indefensible position! Love it!
ReplyDeleteThe whole construction site is turning into a huge fort !
Deletei have to thank one of my followers for putting me on to how to do them (you tube video)
No problem mate, they look fantastic
DeleteAh, problem solved, thanks SK !
DeleteThe interior work you do is just excellent and takes it to another level.
ReplyDeleteThanks AL.
DeleteFlimsy works for me as they always appear as if they've just been thrown up, but once again It is the interiors that amaze me - absolutely brilliant!
ReplyDeleteThanks Michael, strangely enough the interior took the least amount of time on this one !
DeleteIt must have taken a while to make all those internal details! They really do add to the sense of realism, but I just haven't the patience (orimagination) to do so much.
ReplyDeleteThanks C6, but really they're really easy to do.
DeleteMan, I love all the interior detail. Quite impressive.
ReplyDeleteThanks Sean, I'm more impressed that yoou can see it through the windows - a first for me !
DeleteLovely stuff. Many thanks for the update on Vampifan.
ReplyDeleteThanks Paul, I'm still trying to visit him .
DeleteGreat stuff... love the hut :)
ReplyDeleteThanks HW.
DeleteAnother gem Joe! I have to say I like the blue that is showing under green, makes me think of rivers and subsequently an "aquaman" from one song I had to learn by heart for some reason.
ReplyDeleteThe interior detailing is a jaw dropper (am I original today or what? :P) by itself...I just can't seem to understand what I have to do with anything, I'm not over detailing anything! :D
Thanks Mathyoo for the comments.
DeleteNeat model I love your attention to detail in the internal of the hut.
ReplyDeleteThanks Irqan, as it's obviously visible from the outside, the internal detail was worth while.
Deletevery nice build Joe, but the internal details are awesome, mini pizza ...very cool
ReplyDeleteThanks TE, I like the pizza too !
DeleteThat's amazing work and incredible detail. I want pizza now. I'll be stealing your pizza and chairs ideas.
ReplyDeleteThanks Baconfat, the pizza was incredibly easy to make.
DeleteGreat work, love the interior details!
ReplyDeleteThanks Phil, I quite surprised how well the meagre detailing I've added had impressed so many folk.
Delete