 |
| Stairway side that will affix to the model. |
 |
| Additional bracing shown by arrows. |
The pieces used were not fitted flush with the main structure, but were interwoven with it, using the holed in the mesh to key the bits used.
The protruding ends were of course cut off .
 |
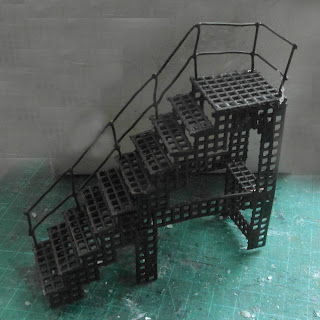
| Railings added. |
Next step was cutting and fitting some sort of railing to the staircase.
I used a short piece of wire mesh for this purpose, but had to cut the horizontal pieces to enable me to angle the railing for the stairs whilst keeping the vertical bits vertical (well almost vertical).
 |
| Undercoated |
A spray undercoat (Bargain Buys' 'Satin' car spray - £1) gave a very good undercoat for the 'rusting' and "wear and tear" look I wanted and also gives yet another bonding effect on the whole build.
 |
| Painted and finished |
A quick wash of various typical rust colours (yellow ochre, dark and 'redish' browns more or less gave the effect I was looking for as can be seen in the photograph at the top of the page and on the right, but may be returned to for 'touching up;/
And that's it the rear staircase to 'the Street' is completed and all that remains is to affix it to the actual model ,
That's it then for this week, thanks for taking an interest.
Its turned out well. Looking at the last photograph I'd not have known what it had been constructed from - I'd have guessed etched-brass.
ReplyDeleteThanks Roy, I'm pleased enough with it. The plastic canvas stuff is a good substitue for etched brass ans is far cheaper and a little more substantial in thickness.
DeleteLooks Great!
ReplyDeleteThanks HW, it does the job imo.
DeleteThat looks terrific Joe. I look forward to seeing some piccies of it affixed to a building. Great work :-)
ReplyDeleteThanks Blaxxm I'll be attaching it to the street this week, so piccies will follow, along with Sid of course.
DeleteNice modeling, Zab!
ReplyDeleteThanks Jay, 'nice', but simple and easy to do.
DeleteVery impressive Joe!
ReplyDeleteThanks AL, sometime simple and cheap is just as effecive as anything else.
DeleteExcellent and what a great use of relatively cheap materials! It will look great on the table I am certain!
ReplyDeleteThanls N667, considering I've had both the mesh and wire for longer than I care to remember it's cost much less than £1 - so I'm very happy.
DeleteThat looks very good! I'm all for the use of cheap materials, so this is quite inspirational as well.
ReplyDeleteThanks C6, it's almost compulsory now for me to "go cheap". If I could find a quicker way to gluing the bits together, complete fire escapes are not beyond the realms of possibility.
DeleteVery effective set of stairs. Would look perfect on an industrial or scifi table.
ReplyDeleteThanks Brummie, they would indeed not look out of place in those situations, but I do know of older office buildings here in Newcastle where they wouldn't look out of place either!
DeleteMy Goodness, the God of Scratch built terrain surprises me again. I've stolen your book technique, your trash bag technique, and others but now I have to steal another one.
ReplyDeleteThis comment has been removed by the author.
DeleteThanks BF, you're welcome. I ;ve used this stuff as storage shelving too in my Superdupermart too:
Deletehttp://zabadakszombieworld.blogspot.co.uk/2013/02/clean-up-on-aisle-four.html
oooh, that stuff would make great wire pallets or pallet rack shelving as well.
ReplyDeleteIt certainly will and also as "Chinese" windows, sailing ship deck-hatch covers, industrial windows, 'wire' fences - to name a few of which I've used it for.
DeleteLooks great now they've been painted Joe! Looking forward to seeing them in place on the tabletop.
ReplyDeleteThanks Bob, all in place now, posting about the 'fittting' tomorrow
DeleteI like these stairs and with the paint they look even better.Maybe some rust-effects will add some more feeling? What do you think?
ReplyDeleteThanks Ptr, though it may niot seem it from the photos there is in fact a rusting effect over all of the staircase - maybe I've done it too subtely.
Deleteyes I missed this one. The stairs look very good. A really clever idea to use the plastic mesh.
ReplyDeleteThanks Clint (you did catch up!), I'm sure I'm not the first to have the idea.
Delete