Welcome to my blog, the story of my continuing journey into the World of Zombie Wargames.

Monday 29 October 2012

Cottage (1)

This is the first in what will probably be several posts concerning the building of my cottages.

The seed of this idea was probably first sown in Brummie's Blog back in July, when he started making cottages for his NMRIH game.
It was then nurtured by Vampifan's fine rendition of a Stoelzels' cottage on his blog in (and finally I was completely hooked on the idea of some cottages by Colgar6's rendition of  his "Golden Hills Sheltered Accomodation"  which again used the Stoelzels Cottages.

To get my excuses in early, this was a a bit of a rushed paintjob; this last week has been pretty rough for all sorts of reasons and I haven't managed to get as much done as I would have liked, plus I hate painting anyway (buildings, figures, my living room etc.)
 As a kind of bonus, here's Sid beside some of the sacks I made (as shown first in last week's blog.). I realised that there was nothing to show the relative size of them last time.
 
I actually started making the cottages with a friend (who was new to my modelling ways), so this is the prototype, #1 and he has number 2; number 3  is at about the same stage as this prototype and number 4 is a bit "different" and you'll see what I mean by different in a few weeks time.
I wanted all the cottages to be very similar in their general appearance, but each unique in their own way. They all  have about the same footprint of 6" x 4-5 " (150mm x 100mm-125mm) excluding the chimney which is either intergral to a wall (as in this case) or is buttted onto the wall as in cottage no 2)
This photo shows cottages  numbers one and two during their construction, each one sits about 10mm above the ground level.
The height to the eaves is about 75mm above the 10mm "foundation" with another 75mm to the roof ridge.
The cottage on the right is #1, that on the left is #2 (my friend's one). 
From this photo you can hopefully see that they are very similar, but #1 does have a window in the upper eaves.
The chimneys are also made from different materials, cork and foamboard; both have different properties and I've used foamboard for the chimney in cottage number 3.
The photograph on the right show the rear of the building, nothing remarkable there however.
As you may have guessed these cottages were all made using more or less the same materials for the main building shell. The ubiquitous wooden coffee stirrers provide the planking for both the wall and the floors of the buildings, but there are other materials too such as the back step which is two pieces of scrap plastic glued together.

All the cottages have removable roofs (except number 4 for reasons which will be obvious when you see it) and will have detailed interiors, after all, no-one want the wrath of Van Fampi to befall them !
The windows are all acetate and the doors do actually open.
I've finished all internal walls in cottages 1 and 3, including their opening doors and I'm currently scratch building the interiors, although I may have to revert to some of the WorldWorksGames interior props, for speed.
As for cottage number 2, well even I don't know how that is progressing though I've been assured that is is !

 I think that in a couple of weeks I'll have completely finished all three of my current cottages, including their internal fittings. I should also have finished painting my home-made beds (about 16 of them). I've also been working on some tenements whose progress has been stunted by my indecision on their internal designs, but I should have the external shell finished by the end of November. However, like many others I suspect I do get side-tracked into other projects, the photograph on the right is one such one. It's a sheet of thin A4 card, roughly gridded into rectangles, I'll report more on this in the future, if/when the idea comes to fruition !.


That's it then for this week and as always your comments are both welcomed and appreciated and let me take this opportunity to welcome my latest followers SapperJoe and Paulalba - "Welcome !"


Monday 22 October 2012

Vic's Gaff


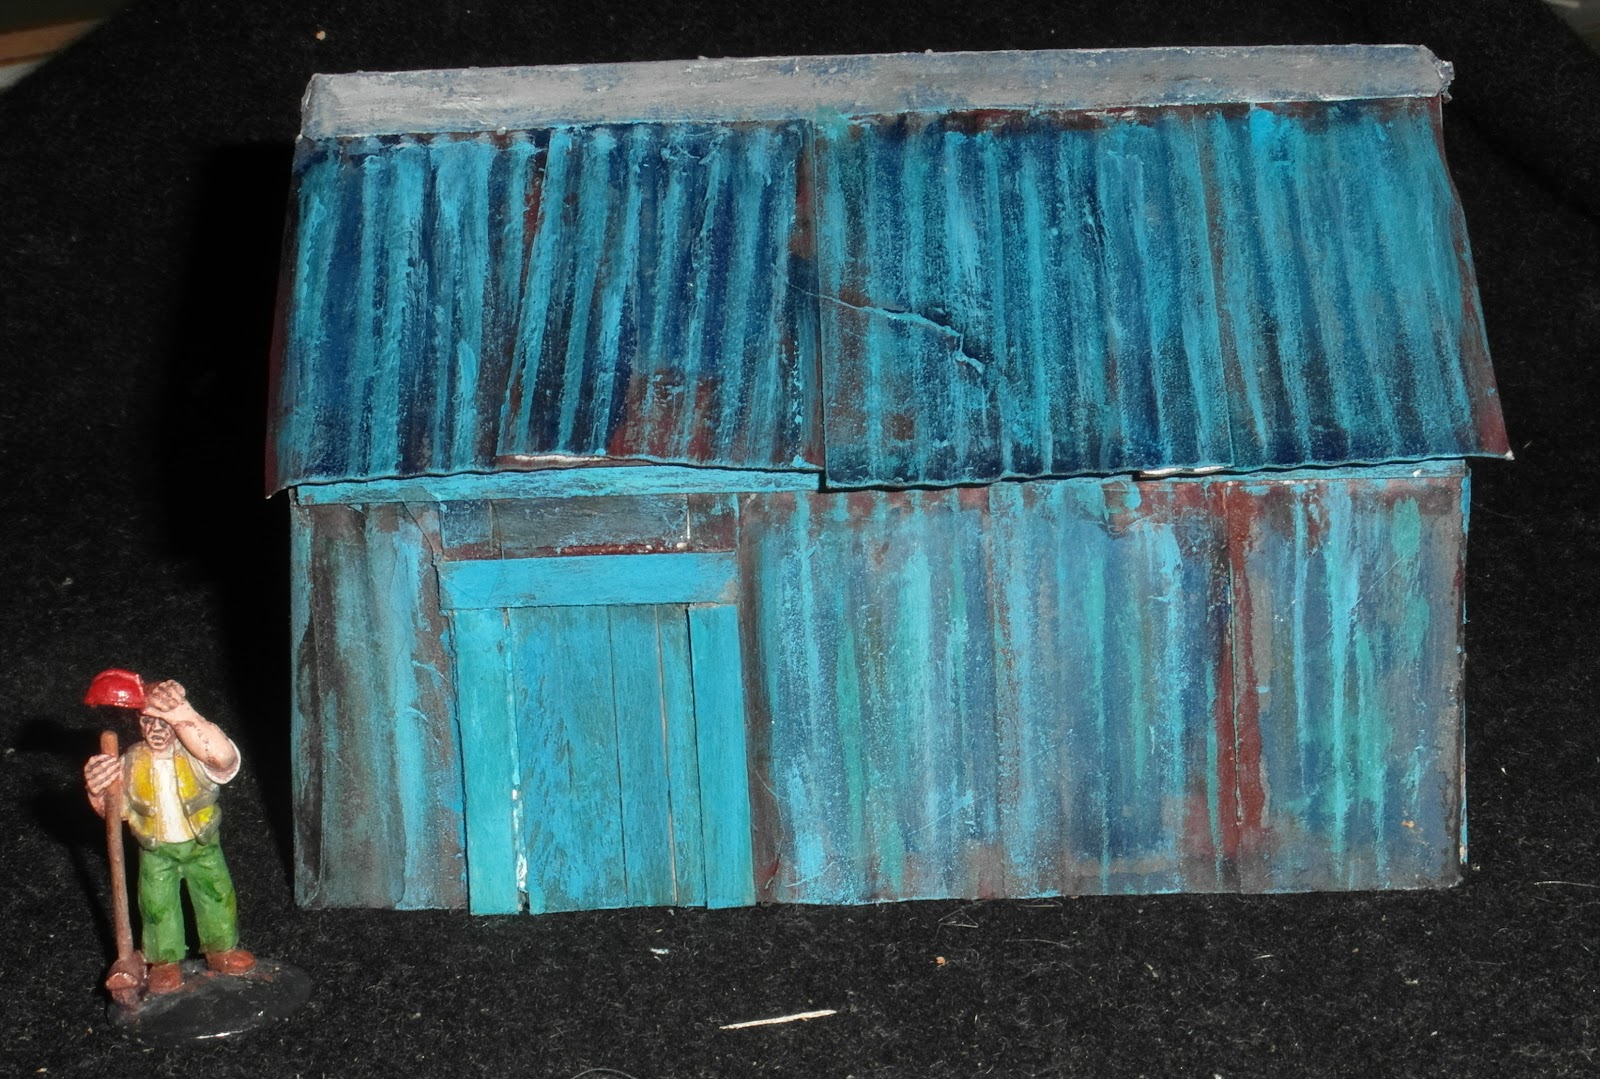
Front view (the double doors don't show up well)
Well, OK, it's not really a rendition of my mate Stuart's shed and it's really my attempt at a run-down garage, but for some reason it reminded me of him and what I envisioned his wargame work/painting area to be like (a long time ago).

The building came about whilst I was watching the England v San Marino football game (it was a really boring first half) and I designed, drew out and cut out the whole thing by the start of the second half. (The second half was better and therefore work stopped on the model.)

I wanted a feature on each of the four walls, so this side has a window in it .
The model itself is made of a fairly thin card frame to which has been added some thin crimped card.
I didn't want to risk my newly purloined crimper with the thicker card that I used for the shell of the building
The effect I wanted was that of corrugated iron sheets, so they were all cut to a uniform size (about 50mm x 30mm) and applied to the model.
This does have an advantage in that it makes the model slightly stronger with the extra additional layer.
The rear of the building has a high window as its feature.
The frames for all the  windows, door and the upper part of the rear of the building are made from the ubiquitous wooden coffee stirrers.

Both the windows in this model have been "glazed" with clear plastic. (I wouldn't want Van Fampi on my case now would I ?)

The final side of the building showing the side door. (yep, boring. -  I know)

The roof was made in exactly the same way as the main shell of the building, card then thin corrugated card on top, but it does have the addition of another thin sheet of card along the ridge; this is meant to represent roofing felt (possibly also  known as tar-paper, but don't quote me on it.)
It appears as a fairly uniform grey in the photos, but I blame the crap cameraman for that. It is actually several different shades of grey and has a texture too, created by a small amount of wall filler
 Another three-quarter view of the building showing that the doors are openable.
The doors are made from - yes, you guessed it - coffee stirrers.

Overall approximate dimensions are
Base: 75mm x 125mm 
Height to roof:  50mm
Height to roof ridge: 85mm
I also reinforced the internal corners of the model (coffee stirrers yet again).

Time taken to assemble the already cut-out walls, roof parts and corrugations about another hour.
 

Here are two views of the inside of the building.

I had decided early on that I wanted the whole building to appear fairly run-down, both inside and outside, so the inside got a similar treatment to the outside.

None of the walls were actually fully painted in any particular colour, but as i used paints for one thing or another, whatever was left on the brush was wiped off on the inside walls.

 The inspiration for a lot of the inside detail came from Zombietown (http://www.skankgame.com/zombietown.html), the sire where I really started my venture into zombie wargaming, even though I was looking for ideas for my then gangster project.

The stains on the floor and the accumulated muck in the corners (dust from filing cork) all add to the overall  "lived-in" look.


This next view shows many of the bits and pieces that I used to detail Vic's Gaff.

The workbench is four pieces of card (top, two sides and a shelf).
The shelf has a piece of piping on it, which was cut from a skewer I had used to stir some silver paint with (god know when). On the bench is a book, a newspaper and some "gentleman's reading material", scratch built or left-overs from Nipper's Newstand (March 2012's blog, as is the poster above the bench.

The shelf on the back wall was a piece of card on which there is a box (scrap card) a couple of cylinders, representing rusting paint-tins and some wire mesh which I've used in the past for leaded windows. Underneath the shelf are three more slightly larger cylinders painted in red and yellow (a colour scheme I've seen used on cooking oil in my local cash and carry!) No doubt anyone familiar with WWG products will recognise their tool-box. Not shown in this photo, but fairly visible in a photo above is a sack I scratch built.
A tyre and a broom handle complete the props in this end (broom handle is a cocktail stick and the tyre is from a card racing car toy)
There's not much going on in the other end of the building, a broom and a few bits of wood on the side shown, another tyre and new piece of corrugation are on the other on the other side, they can be seen in one of the photographs above. The brush was inspired by Sid the Sweeper (the foundry figure I've used a lot for scale purposes) and like so many other things it's probably well overscale. It was made from a small piece of cork and a cocktail stick.

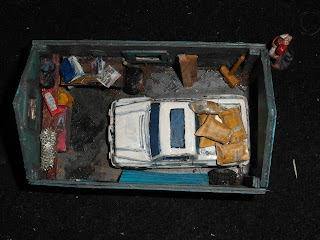
Finally here's an aerial view of the building, just to prove that I can in fact get a vehicle in it, even though its a bit of a tight squeeze.
Even with the vehicle in though you can see that there is still room left for figures to fit in, especially as I use 20mm bases (pennies or washers).
In the back of my pick-up truck are some of the sacks, which I scratch built after making the experimental one for this model.
Designing, cutting out, painting, making props and everything else that went into this model probably took no more than five or six hours total, but was spread over six days, so about an hour a day.

That's it for another week then and as always comments are both welcomed and appreciated.

I'll also take this opportunity to welcome my latest follower  - "Dark_Jober" to my blog, I hope he and all you others that peruse this site find something to interest or entertain you.

Monday 15 October 2012

Crate Progress

Following on with my current theme of using up my bits of scrap from other projects, here's my latest efforts.
As will be obvious, it's nothing fancy, merely some crates really crudely stuck together.
I made no attempt at squaring them off nor did I make any attempt at accurate measurements for them. Most measurements being done by eye.
This intial batch was made primarily from lollipop stiicks, some of which are of the actual used variety, whilst others  were bought many years ago for the princely sum of 67p (for 100 sticks). The sticks are about 100mm long (excluding the rounded ends) and about 10mm wide. In addition to the loolipop sticks I've also used those ubiquitous coffee stirrers.
This second batch of crates uses the coffee stirrers solely.
They're made in exactly the same fashion as the ones above and easier to make as the stirrers are thinner than the lolly sticks and consequently easier to cut.
In the future, if I make any more of these crates then I'll be sticking to the coffee stirrer variety.
Here's a photograph of the two varieties  of crate side by side .
There is of course a very practical point for making these models, in that not only do they provide cover for our heroes but they also add to the scenic aspect of our games.
I've purposely left these crates loose so that they can be utilised in more situations and as can be seen in the photographs a two-high barricade of them can appear very substantial.
There is also another aspect to these that is not apparent from the other photographs and that is that, not only are they hollow but they also have a side missing.
I had the idea that once a box was opened it could be turned over to reveal what was inside - it was one of those thoughts that made sense at the time.
They can still be used as an indication of a crate having been searched though.


Currently in the pipeline:- Operation DFS Winter bed-sale is almost complete and should be blogged about next week; more Urban Road terrain has been started; my cottages ar3e currently having roof tiles added (individual tiles - they're no fun at all); work on my tenements has continued, but very slowly and I made a building during the England game this week (yes, I was that bored)  - I would have had it finished too if the match hadn't picked up a bit in the second half.

Well, that's all for this week, comments, as always, are both welcomed and appreciated.

Finally, to those I haven't already welcomed to my blog - "Welcome!" - (that would be aimed at my two new followers, Chris and Kris) I hope that you find something of interest here.

Monday 8 October 2012

Fruit and Veg

I, probably like many others I suspect, have many projects going on at the same time.
 One of my problems is that when I'm building something I do like to not overdue it and let the model "rest" for a while. This is really to give all recently glued parts time to thoroughly dry out as handling models (especially large ones) too much I've found can lead to all sorts of problems.
The consequence of all this is that my wargames' room table looks like the above two photographs most of the time (yes, there is a table somewhere beneath all the crap). A few of my current projects can be seen in the photos, but I'm not going to going to expand upon these until a future date.
One of the side-products of having so much going on is that there is a lot of "rubbish", offcuts or whatever left over and I'm a great believer in "It'll come in handy", so I tend to keep most of the bits and pieces, in the hope that they'll be useful - one day.
Some of the stuff I've used recently is shown in the photograph on the right: Lollipop sticks, coffee stirrers, cocktail sticks, cardboard and modelling putty (it used to be called plasticene when I were a lad).

Don't ask me why, but I was inspired to build a fruit and veg stand from the above bits and pieces (plus some newspaper and plastic balls from a pellet gun). Amongst my many current projects I do have a small shop that needs outfitting at some time and this could be used for it but it's probably more suited to a supermarket. The two photographs above show it in its raw state.
 Adding the bits and pieces to the various units for the fruit and veg wasn't as hard as I though it was going to be.
Here are three photographs showing the finished article along with Bob (I've always thought of him as Bob the builder even though he's probably a road-sweeper), for scale.
The model is about 12cm long (4.5") and about 4cm wide (1.5"). It is about 25mm  (1") tall to the highest point on the centre divide.

A couple more close-up photographs to show the my attempts at various fruit and veg.
I've tried to represent carrots, bananas, apples, lemons, parsnips, oranges, cabbage, lettuce and potatoes with varying degrees of success. These were chosen simply because of their ease to make - pineapples were right out !
My biggest disappointment was with the bananas, but I was quite pleased that most everything else came out ok. As is the way with these things, everything is over scale by necessity, but it's not too noticeable.

At each end of the stand is a small shelf that I decided to put on representations of brown bags and a scale mainly because it looked too bare and I couldn't think of anything else to fill the space with - I thought it would have looked a bit strange just left as it was.
Some of the products have been given a gloss varnish, but most are varnished in  matt although this doesn't really show up very well in the photographs (I blame the rubbish photographer).


My next mini-project will be the mass production of beds made from scrap bits and pieces. The prototype is shown here in this last photograph, alongside a WWG bed for comparison.
The bed took me about an hour to make and paint; for a first -time effort I'm quite pleased with the result.  My paint-job is of course up to my usual standard (one step off piss-poor), but in my defence it was a bit rushed..


That's all for this week, and as always comments are both welcomed and appreciated, thanks for taking the time to look, I hope that there is something here to interest you.

Monday 1 October 2012

Sofa so good

My attempts at card modelling have, to say the least, been less than inspiring. I, like many others I suspect, was seduced into attempting it by the modelling  expertise of others (I'm looking at you Vampifan).  The photograph on the right shows a typical box-type structure that is meant to represent a sofe (settee ?). Unfortunately it is typical of my attempts at card modelling - an abomination of something, but quite what remains unknown.
Continuing on from using my bits of scrap left over from my current builds, I've again utilised the scraps of cork and a few bits of foam-board left of from my urban terrain build.

The photograph shows all the necessary pieces make some chairs and sofas with.

The dimensions for the sofas vary, depending on the number of seating spacess, but they are basically the same for all seating. Five pieces make up each piece of furniture; a back; two arm-rests, a base and the seating.
 All the cork pieces are about 4mm-5mm thick.
The base is 10mm x 15mm (per "seat"), on top of that is a piece 10mm x 15mm approx. - (and again, per "seat").The arms are approximately 15mm square, whilst the back is about 20mm tall, 15mm per "seat" long with an additional 5mm added to each end to allow for the arms-rests.
When assembled the first few prototypes looked like this:
I was very happy with the results and from the above photograph I'm sure you can make out my attempts at making a few different styles.
Altogether I had enough bits of cork left to make eighteen sofas (from two to four seat capacity and around about  twenty chairs.(You can just make out the black painted ones in the background)
The photograph above left shows the first coat of paints applied to them (actually two coats, as cork soaks up paint like nobody's business). When they've thoroughly dried out, I'll be giving them a dark wash and then some high lighting Some will be given a matt varnish, to represent fabric, whilst others will be given a gloss varnish to represent leather.

Finally just to show the comparison between my homemade sofa and my wreck of an attempt at a card one:


Well, that's it for this week, I hope you find something here ot interest you and as usual, all comments are welcomed and appreciated.