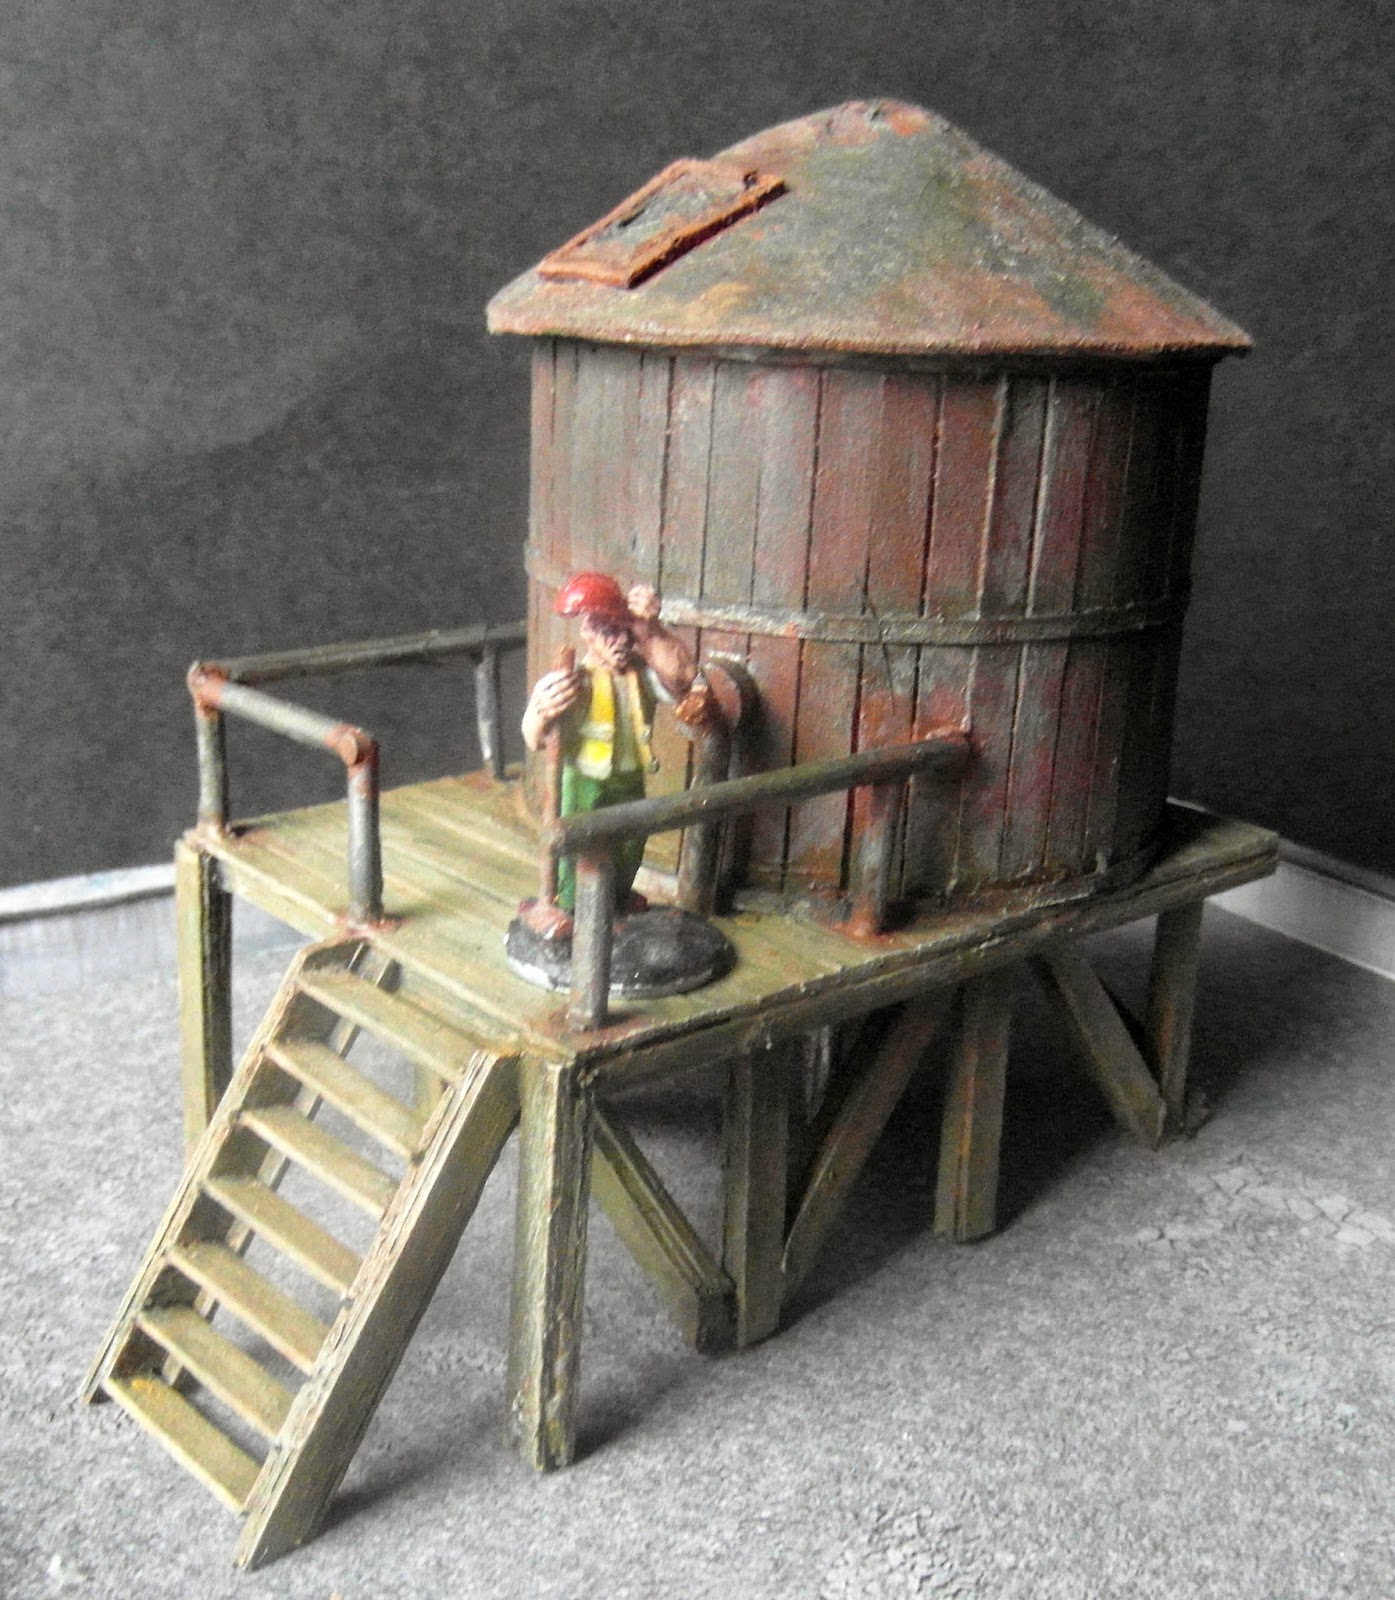
 Well I don't have to ask "Can you see what it is yet ?" as the title tells all.
I cut the gravy tube into two, about halfway down the cylinder (it's about 5" tall and 3" diameter), giving me two pieces, the one on the left (with the internal base) is the one I selected for the tower, though the other was also retained.
 |
| Original 'pot' |
The two pieces were tidied up with a file to level out the rough cuts and then sanded a bit. As the rough bit would be hidden by the roof I didn't worry too much about it.
Next, I counted out 60 coffee stirrers as I was interested to know how many I would actually use for this build and promptly set up about cutting off one end of each. I tend to only cut one end to save time, as I know that I'll be cutting the other end at some time too.

When set I snipped the excess pieces off, made easier by having the gap already there for just such a purpose.

Some of the parts cut off were then glued to the 'gap' and were also snipped off. For variation, the second tower had a piece of corrugated card glued to the outside of it (having scored the surface once more) just in case I was in the mood to make another (I wasn't).

It's made entirely of coffee stirrers of course but there are four layers of them, making a substantial beam. The width of the platform is about the same size as the base of the tower but the length is the base size plus sufficient room to fit a figure or two.
just for information, I use Evo-stick wood glue for nearly all my coffee-stirrer related builds.

 The photograph on the right shows the platform about three-quarters of the way through gluing the decking on, whilst the second photograph shows the platform after completing the decking and trimming it.
You can easily see in the photograph that for the beams I've used a thickness of four coffee stirrers, which is usual for most of my beam-type builds.
Square-cut length of trim could also be used for this purpose and would save a lot of time, but each would have to be cut with a saw; I've found I can snip two thicknesses of stirrer easily and only resort to a saw for more layers. (I'm also a skin-flint and hence I use coffee stirrers)

The left-hand photo shows the jumble of legs and the need for the whole assembly to be filed down and sanded.

First off let me say I have no idea how these tower operate, nor do I claim any knowledge of what they actually look like, so I just added bits and pieces in a pseudo-random way.
The left hand side has a pipe added from sprue whilst the front right has some sort of pillar with gubbins attached, also from sprue (from the Wargames Factory Survivors set if memory serves).
The inside of the tower I wanted to also have a couple of pipes from its centre to the base of the model and they can be just seen in the 'legs' picture above.


A hole was made in the rough centre of the tower and a corresponding one in the platform below the two pieces of sprue selected for the pipes were glued into a piece of foamboard that was in turn glued to the inside of the tower as can be seen in the photographs.

I needed some sort of access to the platform, so I made a quick set of stairs, using some of the offcuts from the various bits of stirrers I had lying about.

With seven or so steps cut to width as accurately as possible I assembled the whole into something passable as a staircase.
I also added two backing strips to the assembly, which not only gave it extra strength but also made for a better join when it was added to the platform.

With the stairs in place I next added some sprue railing to platform; you can see that one of the legs was very crooked, but I had run out of suitable bits by this time and I just left it as a 'feature'.
Next I turned my attention to some detailing and the all important roof.
For detailing, I added three bands of card to the base, top and the approximate centre of the tower.

For the roof it would be a cone, made from a circle of card cut from the back of note-pad (it's soft, thick and pliable, so very suitable for this purpose. I used a paint-tin fro the circle template of the cone, found the centre of it and cut larger and larger segments until I got a height of roof I was happy with and I also trimmed about 5mm from the circumference.
On the inside of the tower I glued bits of scrap then curved them slightly inward, these would act as supports for the roof, rather than just relying on the edge of the tower.

As mentioned previously I added the two extra 'front' legs; for some reason I didn't think the overhanging bit where a figure could be stood looked right - go figure.
With the front legs being the last actual modelling to be done was finished and it was then on to undercoating and painting.
I used various browns, reds, blacks etc to get the overall effect I was looking for and whilst it may not win any prizes, I'm happy enough with it.
Dimensions are Platform 4"x3" and 1.5" tall.
Tower 3" diameter, 2" to eve of roof and 3" to apex.


I'd like to welcome my latest follower the author Todd Brown of the excellent "Dead" series of books, and others, but more of that next week.
That's in then for this week except to say that as always that your comments are both welcomed and appreciated.
That would also make a fine scenery piece in a Wild West skirmish game. You really are the master of coffee stirrer modelling, Joe. What a fantastic model!
ReplyDeleteThanks Bryan, yes you're right it would nd the platform could also double as a platform for a gallows.
DeleteI doff my cap to the the king of all coffee stirrers, my friend. Absolutely marvellous stuff. Not only a great piece of modelling but a stonkingly good paint job to boot. But I wouldn't be sticking that on any Wild West Table. It needs to be on a sky rise rooftop with the likes of Daredevil or Spider-man 'zinging' by :-)
ReplyDeleteThanks Blax, but as I keep saying it's nothing that anyone else couldn't do. The model was on the roof of the tallest building I've ever made and it'll feature in a future blog.
DeleteWhat a great build! Fabulous use of the Christmas leftovers too, really impressive work Joe.
ReplyDeleteThanks Michael, I can't afford to use anything other than scraps !
Deleteyou really are a source of inspiration for scratch building terrain. That looks awesome and I feel that I should have a go at one or two of them at some point soon. I've looked for coffee stirrers here in nz and can't find any - just how are they different from lolly sticks? are they just longer?
ReplyDeleteThanks CW, the stirrers I use are about 5" long and about 1mm thick by 5cm across. The lolly sticks in the UK are at least 1cm wide, double the thickness of a coffee stirrer and noticeably shorter (maybe 4").
DeleteI get mine from a Cash and caryy store, but originally I used tapers used for lighting busen burners (these are much longer (about 6"). The stirrers are available with coffee (unfortunately) in places like Starbucks -maybe a friendly manager of such an establishment oculd help you ?
I will have to keep looking for them. If they are similar to tapers used to light bunsen burners, I at least know what i'm looking for (chemistry teacher for my sins :) )
DeleteWill practice my google fu to see if I can find some as the tapers cost a bit more than that I think!!
The stirrers I use are almost identical to the tapers (called spills in this end of the UK) except that they're better finished and have rounded ends. I actually prefer tapers to stirrers but find it difficult to get a hold of them now that I'm no longer in teaching (maths).
DeleteAfter a quick search on google they appear to be about £10 per thousand. I used "wood, spill, tapers and other variations for my search and wood coffee stirrers gave lots of results. School supply catalogues for tapers and office supply catalogues for stirrers could also be worth looking into.
Outstanding work Joe! Your painting just finishes them off perfectly too. Very impressive :-)
ReplyDeleteThanks Paul, I was quite worried that the paintjob wouldn't look right, but I'm happy enough with the final result,. I always bear in mind that it's just for wargames and just for me !
DeleteI really like that Joe. Great Tutorial. I quite think it would make a good post apoc house. (with a bit of proper dressing obviously)
ReplyDeleteThanks Brummie, I think my ideas of the PA scene differ from a lot of other views, I think Fallout 3 is closest to my thoughts.
DeleteWow! Great build Joe! Very inspirational, this is something else I need to steal off you.
ReplyDeleteI've said it before but I'm going to say it again, it's amazing what you can do with coffee-stirrers.
Thanks Bob and of course I'd be delighted to see other efforts with coffee stirrers whether copies or originals.
DeleteMaybe I could start a trend ?
Thanks Chris, I've found them to be useful for all sorts of things and at £2 a thousand who cares if a few are wasted.
ReplyDeleteTalk about exellent work :) great ide...
ReplyDeleteThanks HW, it's easy enough too to copy.
DeleteThat's a great piece of work! I suspect that it took quite a long time, though - there are many steps in this construction...
ReplyDeleteThanks C6, it took me quite a long time I guess, but most of it was drying time for the wood glue. This was actually a 'side-project' which only got bits done on it whilst I was working on two other buildings and finihsing my recently made yards.
DeleteExcellent. I must admit I do like everything about it. A very versatile piece anywhere from pre Victorian to present day. I am most impressed with how you have done the stairs. And as C6 Says I clearly took a long time and it was time well spent as far as I can tell.
ReplyDeleteThanks Clint, much appreciated. It's very difficult to guess how long it took to make as I worked on it sporadically sometimes for as little as 15 minutes at a time (maybe just to glue stirrers together for example). But a best guess would be eight hours.
DeleteReally good job man. That is a really cool handmade scenery.
ReplyDeleteMerci Shuby, it'sscenery like yours that help toinspire me.
DeleteGreat work, Joe!
ReplyDeleteThanks Tito, much appreciated
DeleteIt's a fantastic piece of terrain Joe and I'm pretty sure not EVERYONE could do it. Very well done!
ReplyDeleteThanks Mattyoo, I'm pretty sure that with even a modicum of scratchbuilding skill, I haven't done anything really difficult after all.
DeleteNice!
ReplyDeleteVery good work.
Merci vous Samy, très appréciée
DeleteReally good work again from you! No surprise when I tell you I love to read your blog, you make it look so easy.
ReplyDeleteThis water tower can be used in multiole settings.
Thanks LS, you're right about the multiple settings of course and the basic structure (the platform) has any amount of other uses too.
DeleteExcellent job there Joe.Good pictures too and very creative.Keep blogging my friend. :)
ReplyDeleteThanks Ptr, I did take about twice as many pictures as I used and "cleaned up" the ones ones I did use to make them clearer. For this build I did try to show how I made it as clearly as I could.
DeleteMany thanks for the encouragement.
The water tower is genius.
ReplyDeleteThanks Blax, much appreciated
Delete