Pages

Monday, 27 February 2017

Church (take 2)

Awkward, skewed angle !
Taking a rest from all things nautical I've made another assault on my church build and sundry other minor bits and pieces, all connected to my pirate project.
The last time I had done anything to this model was quite a while ago and then it was merely bare foamboard
As can be seen from the photo on the right, it's come a long way towards being finished.
The ridge tiles from on the main building and those on the tower have both been added as has a small building abutted on to the rear wall of the church, though not visible in this photograph..

Photo showing the extension


The whole model was liberally covered in filler, using a very watery mix to give some texture to the otherwise smooth walls.
This would be later sanded down and leaves a very nice surface, though not smooth.
This filling procedure also helps to fill in all the minor cracks and joins that develop in any scratch-build model that I make!


The front, all gunged up with filler.
Side view (doh!), showing initial roof undercoat.
 The roofs were all given a coat of thinned filler and allowed to dry before any paint was added.
When the filler was dried, a dark brown was used as a base coat/primer to which I gradually dry-brushed lighter and varied colours, A dark red, a slightly lighter red, some yellow ochre,  a light brick red and finally some terracotta tile colour. (All £1 emulsion tester pots)
Initial wall colours
The body of the church is also painted with using another £1 tester pot tester pot and I'd forgotten just how long it takes to paint models!
The bits that weren't painted in he creamy yellow colour would be undercoated in grey and highlighted in white. Door colours are yet to be decided!
Another view of the progress so far.
Spot the error
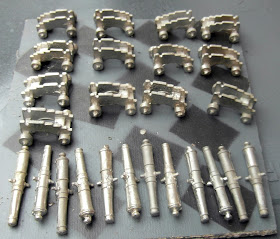
Other than the church I've started on the cannons needed for the three new ships. To fill all the gun ports I'd need 14 cannon, so I'll have to take a stock-take of what I have, but in addition I added the cannon seen on the right  and although I haven't a photograph I've undercoated and painted them up, with just some final highlighting and tidying up to do on them.
Four spools of garden twine from Poundworldbargainland I reckon gave me an almost lifetime supply of ropes, lines and cables that I'll ever need. Even though dark green twine is included it's easily made into a black tattered rope too (and of course there's always jungle vines too).
Ropes coiled and tidied in ship-shape fashion
Finally in a burst of unparallelled enthusiasm I quickly  finished off the three rowing boats that came with the three ships in less than an hour (I know, it shows)
They're not the best models , but are usable and having looked at the prices of similar sized  resin ones I'm pleased enough with these.


The plan for the next week is to finish off the church, at least one ship and  a dozen cannon, all whilst I plan the necessary terrain boards (so far, a beach, a harbour, a rock (yeah I know) and a fort. In addition to which I'll also be planning a village to accompany the church and in a similar style.

That's it then for this week, I hope you've found something of interest and as always your comments , good bad or indifferent are always welcomed and appreciated.

Monday, 20 February 2017

Ship Ahoy

Ship, newly undercoated with grey spray and a little paint
Yes, it is a bit of a twee title, but it gets the point across that I've managed to get some work done on my 'pirate' ships this last week, despite some real-life family crises.
It's not much really, all three ships have been undercoated  and had some paint added to them in varying amounts and styles.
Having to paint with the  models on my lap and my failing appreciation of colours (not just the poor light or my lack of painting skills) has met with some  unusual (to say the least) colour combos - must try not to paint in the evenings!
I've tried many colours, washes, highlights etc. but am still experimenting!
Deck of the above, showing hatch.

The back end (technical term "blunt end")
Hatch on the front sloping (?) bit.
Crows nest - a figure now sits in comfortably (20mm square base)
Another view of the deck (bored yet?)
Add caption
To relieve the boredom of the above ship. here's the ship converted to a sloop -style, single masted vessel.
It's the most 'finished of all three and I'm fairly happy with  the overall paint effect - so far, there's still a lot more  paint to slap on.
I'd forgotten just how much painting (and time) that these models take to complete.


View showing the "horns" of the original toy around the gunports
Third vessel, clearly showing the pointy end.
The third vessel (the one with the extra hull piece added) I decided to paint in much darker colour *to hide the joins). Unfortunately thought it turned out looking  a bit too dark,  so it was brightened  here and there without losing it's darker look. The masts, spars etc. have has a least three different colour schemes but they're still not finalised.


You can't see the join if you turn the lights low and squint
Another boring crow's nest
The crows nests were converted in two different ways. The first, abandoned idea, saw me cut a notch out of one and the let it rest on a small platform.already on the model. The second method had me cut s hole though the two remaining ones and the the upper mast was pushed through and located in a hole in the mast below. All three has a couple of rails removed from the rear to allow for the filing flat of the crow's nest floor.


Obligatory really boring picture
The current state of my gaming table.
As mentioned above this last week hasn't all been plain sailing (I can hear the groans), my gaming table, now turned being used as a large storage shelf has had to be moved around whilst I've had #2 son put some shelves up. It turns out that although this is not one of the top priorities in his busy schedule (work, eating etc. seem to take preference) I have had two more shelves constructed and with just two more planned they could be finished soon enough.
If I wasn't so useless with DIY things, I'd have done them myself, but illnesses, uselessness (I recently levelled up) etc. all work me - and I should be up ladders etc nor be near to power tools!.
The two new shelves (about seven foot up)
"Jablite", eight bits, 4 x1.5 ft - enough to cover 4ft x 12ft for under £15
I'm also planning the terrain I'll need for my pirate games, do new terrain boards are in order, it seems pirates rarely fought on modern urban roads (even Somalis it seems)- sad I know. To this end I've been to B&Q and bought some "Jablite" polystyrene block; they're a bit tougher than the more well-known polystyrene ceiling tiles but much less tough than the blue or orange foam more commonly used for terrain these days.  They're 4 foot by 1.5 foot, yes they're an awkward size, but I'm working around the problem.
Plans for one of the boards.
So that's it then for another week, it may seem that I've done quite a lot, but it doesn't feel that way!

I hope you've found something of interest and as always, your comments are both welcomed and appreciated.
.

Monday, 13 February 2017

Plotting a Hatch (or two)

"Hatches"
Despite the problems of the lack of space for doing anything substantive I have managed to progress my piratey project quite a bit this week. My good friend Stu who runs Captian's Jack's Locker  (find hin on FB) gave me a few bits and pieces when I visited him before Xmas.As can be seen there is some  variety, though the deck hatches were made as windows and I had to file the,frames down. I also filed the reverse so that they'd fit a little more flush to the decks of my ships.


Oversized chests
In yet another fit of enthusiasm (strange I know), I was inspired to do something with the oversized 'pirate treasure chests', probably prompted by the arrival of all my greenery!


Taking the chests apart gave two lids and bases.
The bases, to me looked very suitable as the type of concrete planters that can be seen in a lot of towns and cities (hence the greenery connection).
I've added some scraps of foam-board, then filler and a sprinkling of sand - they just need undercoating, painting and of course some plants added.
Composite picture of the cylinder
The lids didn't escape my attention either, the two lids, after being cleaned of all their excess bits were glued together, to make some sort of reinforced cylinder, that can be painted up as either wooden (maybe with metal straps) or as metal throughout. Perhaps as some form of water barrel or gas cylinder.
Pirate with Lantern ?

In another attempt to utilise what I could from the Pirate ships sets I was drawn to one of the accessories of the pirates themselves.
The accessory in question can be seen in the photograph I've taken it to be a lantern and in its current form is obviously too large for 28mm figures (he stands about 60mm tall)
The three lanterns
Dowels spars and yards (boring ship bits)

I've cut the bases and handles off and they've become the ships' lantern - a large and prominent lantern mounted on the rear of sailing ships. They were hollow too which made the fitting of a support fairly easy, but you'll have to see if you can spot them on my ships (below) as I failed to take any photographs of them solely.
I've also been busy on the ships too, adding spars and yards (I'm tole that's what they are) in various combinations to give a bit of variety. I did have to buy 2 meters of 5mm dowel (£1.50) for the purpose,  but did also use the mast tops (minus their pennants) provided with the sets.

Plastic mast tops )still boring)
One end glued on with extra bit along the dowel
All three of my ships have also had work done on them the pictures illustrating all the various bit added , the hatches, the yards, the rear lantern etc.. The three photographs following, show the three steps of how I do my 'rigging'. I haven't a clue as to how sailing ships are rigged, so I just try and get some impression of rigging, whilst at the same time allowing for easy access to the decks for figures.


Glue the other end on once the first bit has dried thoroughly.
Use thr thread to wrap around the other bits

I've used embroidery cotton for all the rigging, gluing one end to where the line (or rope) is going to go, allowing it to dry then gluing the other end.
I get the aparent tightness of the lines by wrapping more thread around the thread alreadyin place, this also allows me to tighten up the rigging slightly.
You'll hopefully have noticed a couple of the hatches on the models, the read lanterns and the crow's nest - the latter now being able to take a figure.
The model shown on the left was going to have it's "pulpit" on the rear deck left in  place but as I thought it abhorrent even to my non-nautical eyes, I removed it! This was the only one of the three that I also left the horn-like ornaments around the gun apertures, the others were removed.

Since writing up this lot,I've finished the rigging and undercoated two of my vessels, so just one left  to rig and undercoated before I put the sails on  all three and paint them up!
I feels like I've been a man possessed this week and made more progress than I thought I would or could - and I haven't even mentioned the related building plans I've been working on!

That's it then for another week (hopefully it'' be another one as productive as this last one has been.), I hope you've found something of interest and as always your comments are both welcomed and appreciated.

Monday, 6 February 2017

Shipshape

Rear, back blunt end ,Stern view of the three ships.
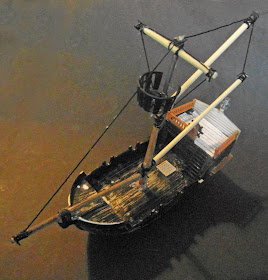
So this week has seen a sudden burst of enthusiasm for conversions of my pirate ships, probably brought on by lighter evenings and better health. I now have three ships, all of which I wanted to be distinctly different to one another. With this in mind I decided to leave the first model in its original state (more or less); the second ship I'd convert to some sort of single masted sloop thing whilst the third would be converted into a larger three masted vessel (utilising the spare mast). This latter idea was quickly abandoned  when I realised that once more I would have too large a vessel than I wanted .

The larger ship conversion was cut in two flush with the rear stairs, if I was converting another I'd go instead for a central cut.
In the top photograph you can see the piece of plastic I used as a keel joining the the two parts of the extended hull.
Two of the ships would have extended work done on their rear deck, namely cutting away the hideous pedestal.(One attempt was slightly more successful than the other)
Not such a successful cut-job.
Two masts successfully removed!
Cutting the two masts off, to leave their bases flush with the deck  was a bit tricky , due to the sides of the ship getting in the way, however I did manage to utilise the open rear cabin door  to slide my hack-saw in and slowly cut through each base of the two masts..
The key (hole) to cutting the masts flush with the deck.
Before....
The crows next as is, isn't really usable at all; the raised mounting in the middle is for a small pole with pennant on , that doesn't really leave enough space for a figure.
My solution to still to use these crow's nests was to cut the interior flat and cut the whole crow's nest from the mast to be mounted in an alternative position against the mast, rather than atop it. Cutting away a couple of pieces of guard-rail enable me to get access to cut the base flush (scalpel and file).
...and after.
Hull piece
The hull extension was a piece of soft card (back of a notepad) roughly shaped, Two piece of plastic glued just beneath the rear and forward decks gave the foundation for the piece of card I used as a deck, scribed with 'planks' to reinforce the sides and to give a comparable thickness to the sides of the ship two further pieces of card were glued in place.


Extended vessel.
Obligatory blurry photo
 The rear decks would also be all slightly different, one I've covered in paper; a second I've used filler on, whilst the third will probably end up having a coffee-stirrer deck!
In case you're wondering about all the white filler stuff on the masts, the rear of the masts each have  slot along their entire height that I wanted filling (it can be seen on a couple of the photos).
There's still a lot to do on these models, but I'm very happy with the progress made so far and knowing that I do have an end product in mind. 

In other news, with the departure of my daughter and her family I should have a lot more space for hobby-related projects rather than just my cutting board on my lap!.

That's it for this week, as always your comments are both welcomed and appreciated